Everything connected, once
The minimum stack that powers your business. Set it up once. It works from here.
After this module: Your infrastructure is live. Domain, hosting, payments, email delivery. All connected.
After this module: your connectors, skills, and a first routine are wired. Your daily work runs where you already live, with no infrastructure to maintain.
This module's pack
Module 5 pack: your infrastructure
Skills, guides, database migrations and edge functions for your back end.
Skills and guides for your studio path. The database and edge-function files come with it, sitting unused until the day you sell something.
The zip opens into a folder named module-5-pack. Downloading it is not installing it. To install it, open the pack in Claude Code. Open Claude Code in your system folder and ask it to list what you already have before it adds anything, then let it add only the files that are new to you.
It cannot overwrite anything you made. Your dashboard from Module 4, your brand colours, any skill you have edited: if anything in the pack shares a name with a file of yours, Claude stops and asks you first, before it copies anything. This pack adds to your system, it does not replace what is in it. The pack README opens with the exact words to paste, so start there rather than typing your own.
See what's inside (55 files)
Skills (8)
/automation-health · /deploy-edge-functions · /email-gate · /security-audit · /setup-resend · /setup-stripe · /setup-supabase · /system-health
Database migrations (14)
Apply these to set up your back end tables and jobs.
Edge functions (9, across 15 files)
Server-side functions you deploy to your own back end.
Build guides (9)
Step-by-step, one per piece: Root system overview · Homebrew and cli · Supabase setup · Resend setup · Edge function deployment · Stripe setup · Dashboard upgrade · Kanban · Hosting options
Plus (9)
The students-tab snippet for your dashboard, the website files your forms and unsubscribe page use, and setup files (README, the Supabase config, two env examples, the email-gate hook, the preview script).
Unzipped it and something looks missing?
Your skills live in a folder named .claude, both in the pack you unzipped and in your system once you have copied them in. It starts with a dot, so your Mac or PC hides it by default. Nothing is missing. To show hidden files on Mac, press Command + Shift + . (period) in Finder. On Windows, open View → Show → Hidden items in File Explorer.
Before you start
This is the heaviest setup month in the course. Not because any one step is hard, but because you are standing up real infrastructure, and some of it has to be verified by other companies on their clock, not yours. Read this before you block out time, so you can decide when to start and start the slow parts early.
You picked the studio path, so this month is much lighter than it looks from the outside. No database, no payments, no domain, nothing waiting on another company to verify. Read this before you block out time.
Plan for one to two focused sessions across a few days. The clicking and setup itself is only a few hours. What stretches it to a day or two is waiting on things outside your control: DNS records propagating, and Stripe verifying your business. You can start those waits on day one and do everything else while they clear.
Plan for one focused session. Nothing here waits on anyone else, so you can start and finish in an afternoon.
What you need on hand
- The apps you already live in. Notion, Gmail, Calendar, Drive. You wire only the ones you actually use.
- Your Claude account login. The Google connectors are switched on in your account settings rather than the terminal, so you sign in there once.
You still download the pack above. Its database and edge-function files sit unused until the day you start selling something, and the storefront lessons are there when that day comes.
What you need on hand
- Two command-line tools, installed once. The Supabase CLI and Deno, both through Homebrew (which you set up back in Part 1). You install them once. Claude runs the actual commands for you from there.
- A domain you own, or one you are ready to buy this month. Your email delivery and your live sign-up forms both attach to it.
- A Supabase account (free). Your database project spins up in about two minutes.
- A Resend account (free up to 3,000 emails a month) and access to your domain's DNS settings. After you add the email records, they take a few minutes to a few hours to verify. You add them, then come back.
- A Stripe account. You can build and test the whole payment flow today in test mode with no waiting. But before you can take a real payment, Stripe verifies your business (bank details and an ID check), which can take a day or two to clear. If you plan to launch soon, start that verification on day one so it is done when you need it.
You do not do this in one sitting
There are natural places to stop and come back. Each piece stands on its own:
- After your database is live.
- After you have added your email DNS records, come back when they verify.
- After you have started Stripe verification, come back when it clears.
And you may not need every piece. The first lesson helps you choose your path before you build anything, so you only set up what your business actually uses.
👇 After this module
Your infrastructure is live. Database, payments, email delivery, dashboard. All connected.
Your connectors are wired, your first skills are saved, and a routine runs on its own. Your daily work, handled, with no infrastructure to maintain.
What you'll do in this module
- Where does everything live? Pick your path. Storefront or Studio.
- How the four tools connect, what each one does and why we use it
- Where to host (and register your domain), hosting plus domain registrar choice
- Set up your database with Supabase, free tier, EU region available
- Choose your email home, when to keep your platform vs send through your own system
- Brand your emails for the inbox, fonts, images, logos, and what email clients actually render
- Set up email delivery with Resend, branded transactional from your domain
- Deploy your edge functions, lead magnets, waitlists, event RSVPs
- Set up payments with Stripe, payment links plus webhooks for auto-onboarding
- Upgrade your dashboard to live data, real-time queries on your business
Studio path ✨ (instead of the infrastructure lessons)
- Wire your connectors, Notion, Gmail, Calendar, Drive, into the apps you already live in
- Turn a connector into a skill, the questions you ask every week, saved and named
- Your first automated routine, work that runs on its own, no database
What you'll leave with
If you're a Storefront 🏪
- Supabase database running in the EU region you chose, free tier
- Branded emails sending from your domain via Resend
- Edge functions deployed for any web signup
- Stripe connected with webhook auto-onboarding
- Dashboard reading live data, not static files
If you're a Studio ✨
- Connectors wired into the apps you work in
- A skill or two for the questions you ask every week
- A first routine that runs on its own, no infrastructure to maintain
Why this matters
Until now, your system has lived on your laptop, just for you. In this module it stops being personal. It becomes the back end of your business. Database, email, payments, forms. Set up once, runs from here. The next three modules build on what you set up here.
Start here
Lesson 1: Where does everything live? →
The shape of a solo business online 🌐
Watch: A grove of separate trees (1:47)
Before you set anything up, here is the bigger picture. There are two ways most solo businesses run online today. One is what you are probably doing already, or about to do. The other is what this course teaches. Neither is wrong. They have different costs, different ceilings, different ways of breaking. Understanding the difference helps you pick on purpose.
The way most solopreneurs run today: a grove of separate trees
Notion is its own tree. Airtable is its own tree. ConvertKit is its own tree. Stripe is its own tree. Squarespace is its own tree. Each one has its own roots in its own soil, its own gardener, its own seasons. They do not share sap.
To get information from one tree to another, you stretch a cable between them. Zapier and Make are the cables. Each cable carries one message: this person paid, tell that tree to send the welcome. The more trees, the more cables. The cables tangle. Sometimes a cable snaps and you do not notice until a customer tells you the welcome never arrived.
Each cable between trees is a separate paid workflow inside Zapier. Cables tangle. Sometimes a cable snaps and you find out from a customer.
You pay a separate bill for each tool. You learn five different interfaces. When one of them changes their pricing or redesigns their layout, you adapt. The roadmap is theirs.
What this course teaches: one tree, deep roots
One set of roots underneath: Supabase, your data. One trunk: your Claude setup, the central nervous system that decides what goes where. Branches and leaves growing on top: your website, your dashboard, your emails, your sequences, your skills. Sap flows freely through the whole tree. No cables between separate trees. No tangles. What grows on top and what stores below are one organism.
Cut a leaf, the tree regrows. Cut a branch, you replace it. The roots stay.
They are products. Supabase is yours.
Notion, Airtable, Zapier, ConvertKit are products. Each one is owned by a company with its own roadmap. They redesign their interfaces. They change pricing tiers. They sometimes remove features you depend on. They decide how you can interact with your own data, and when their rules change, you change with them.
Supabase is a different shape. There is no "Supabase interface" you build your business around. The dashboard is there for setup and the occasional spot-check, but the day-to-day way you see and use your data is the one you build with Claude. A dashboard for yourself. A skill that pulls a contact's history when you ask. A daily summary in your morning protocol. A weekly view in whatever shape suits the week. If Supabase redesigned their dashboard tomorrow, your interface would stay exactly as it was. You built it. You control it.
You stop visiting your data
This is the part that surprises people. After setup, you do not open your "CRM page" anymore. You do not browse rows. The data lives inside the daily flow of your system. The morning protocol pulls relevant contacts when you ask about today. The evening reflection summarises what happened. The dashboard surfaces what needs attention. Your skills read and write through Claude on your behalf. The data is searchable, accessible, structured, but it is the system that touches it for you.
Notion and Airtable were designed to be visited. Their whole purpose is the experience of clicking around your own information. Supabase was designed to be invisible. The data is there when something needs it. You only go and look when you choose to.
Notion vs Airtable vs Supabase, side by side
| Notion | Airtable | Supabase | |
|---|---|---|---|
| What it is | A notes and docs app, with databases as a feature | A spreadsheet styled like a database | A real database, with a setup dashboard on top |
| Who designs the interface you use | Notion's design team | Airtable's design team | You (you build it with Claude) |
| Free tier capacity | Generous for personal use | A few thousand rows per workspace | Hundreds of thousands of rows |
| Different team members can see different rows | Paid plan only | Limited, paid plans | Built in, free |
| Powers your live website signup form directly | Not really, slows down quickly | Yes, with slowdowns at busy moments | Yes, by design |
| Behaves under busy automations | Slows down past a few asks per second | Slows down past a few asks per second per workspace | No documented limit |
| Day-to-day pattern | You log in to look | You log in to look | The system reads and writes for you |
| Leaving with your data | Export to spreadsheet or markdown | Export to spreadsheet | Standard database export, fully portable |
When the patchwork is the right choice
Not every solo business needs to consolidate. The patchwork is a fair shape if either of these is true:
- You run entirely on 1:1 invoicing (Wise links, manual payments, no digital products that auto-deliver after purchase). The consolidation buys you very little.
- You specifically love the Notion or Airtable interface and want to keep paying for that experience. Both are real products you can run a business on. If the interface is what you are paying for, that is a fair trade.
When consolidating pays off
- You run automations. Sequences that go out over weeks. A weekly digest. A nightly cleanup. A score that decays over time. Notion and Airtable both slow down past a few asks per second. Supabase does not.
- You sell digital products that auto-deliver after purchase. Stripe to your code to your database to a welcome email is a few lines. Stripe to Zapier to Notion to Zapier to ConvertKit is six paid workflows that can break.
- You handle EU client data. Five separate products mean five separate data protection agreements, five privacy notices, five vendors to track for compliance. One hub means one.
- You want one bill for the foundation, not five. Supabase, Resend, and Stripe all have free tiers that comfortably cover small business volume. The patchwork tiers usually do not.
What this replaces, in euros
Here is the patchwork most solo businesses are actually paying for, next to the same jobs done by the foundation you build this month. Real numbers, rounded, at small-business scale.
The free tiers are not a trial that expires. They are sized for real small-business volume, and you only move up when your volume genuinely grows. The savings are real, but they are not the point. The point is one bill, one place your data lives, and yours to leave with whenever you want.
Now, which path are you on?
Now that you understand the shape, the practical question for the next four weeks: how far does your version of the system step outward?
Tap the statements that are true for you. Your answers tell you which path fits.
What this means for the next four weeks
Storefront 🏪 · Set up the infrastructure that runs without you. Supabase, Resend, Stripe webhooks, edge functions, sequences. Build only the pieces that match your situation. The next lessons in this module (Hosting through Dashboard) are your map.
Note: the actual pages and forms people meet (sales pages, /start/ pages, sign-up forms) get built in Module 6. This module is the plumbing they'll connect to.
Studio ✨ · Wire your connectors (Notion, Gmail, Calendar, Drive), turn the questions you ask every week into skills, and set up your first routine that runs on its own. Your daily work, automated, no database to maintain. The three Studio lessons at the end of this module are your path. The Storefront infrastructure lessons in between are skippable for you.
Pick one. Build it well. Once you know what you actually use, you can pull pieces from the other path later. Don't try to learn both at the same time.
Next: How the four tools connectHow the four tools connect 🔗
Watch: None of this is actually AI (0:31)
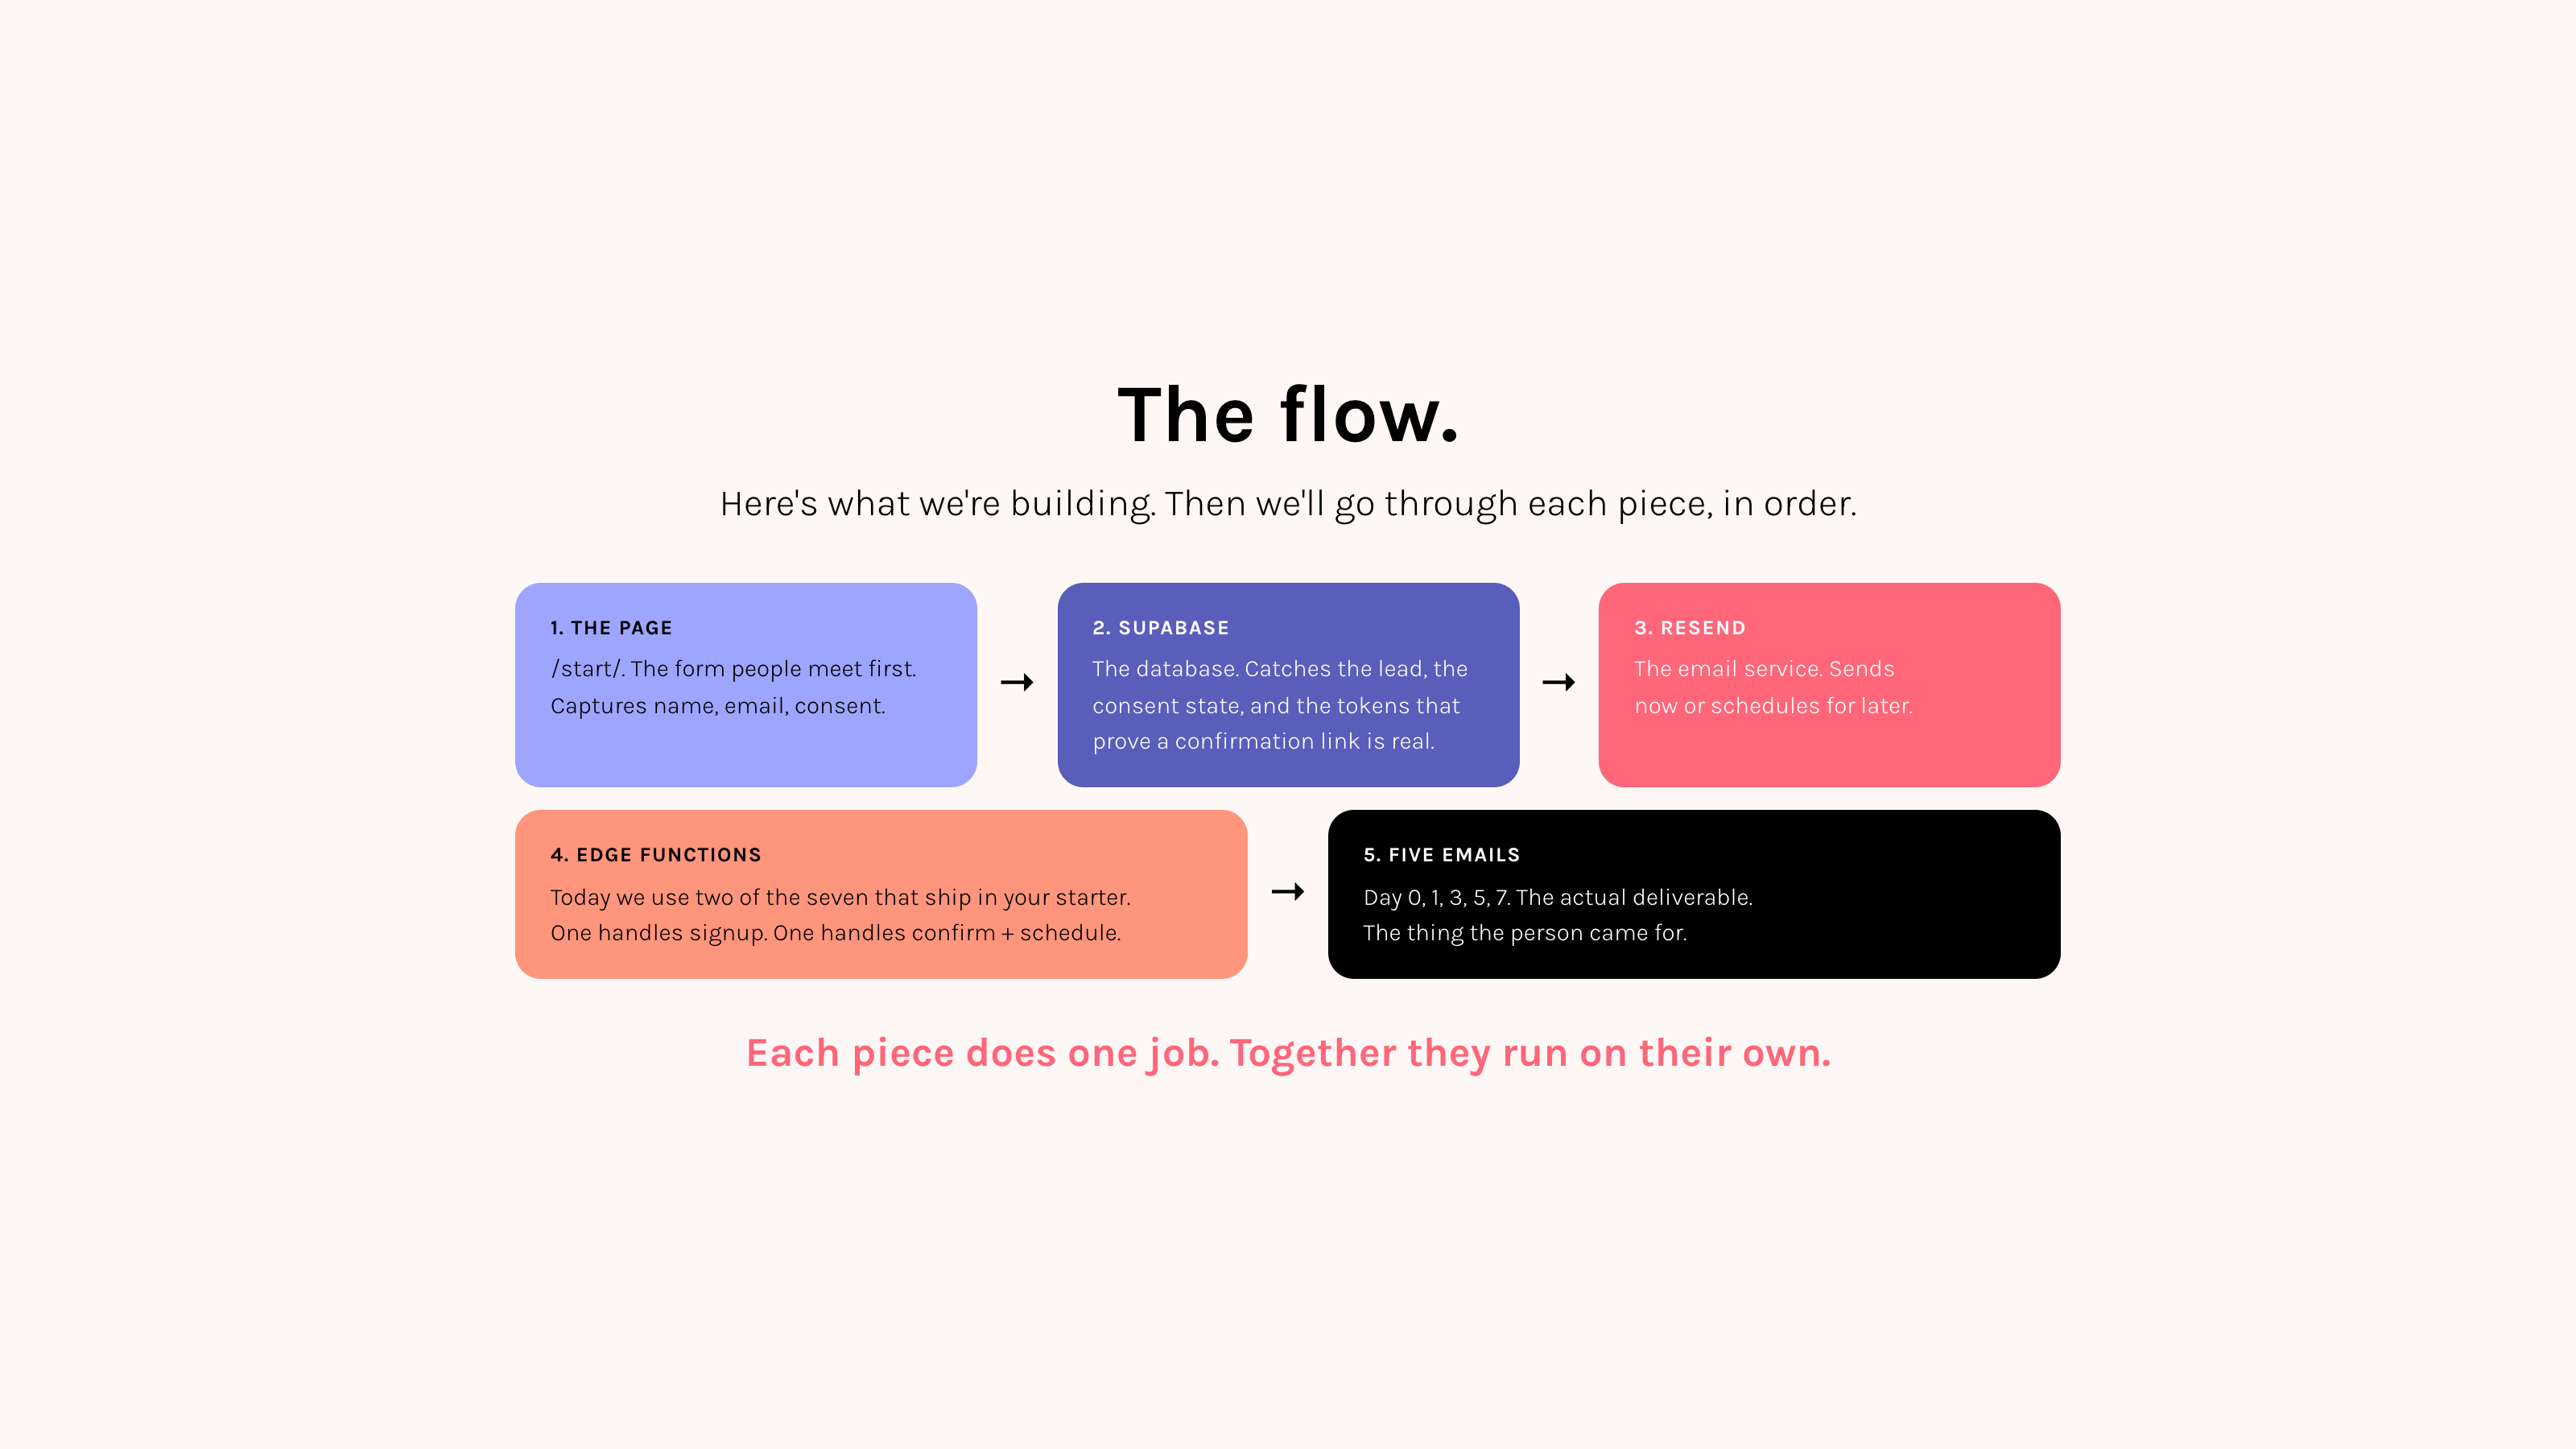
Before you set anything up, here is what you are about to build. This module connects four tools to your root system. Each one has a specific job. Together, they handle every form, payment, and email your business runs on.
The four tools, in plain language
1. Supabase
Your database, login system, and the place where your automations live. You pick the hosting region at setup (EU available); the compliance work stays yours either way. Free tier covers a small business.
2. Edge functions
Small pieces of code that wake up when something calls them. The bridge between your website forms, your database, and outside services. The only place keys are safe.
3. Resend
Every automated email leaves through here. Welcome emails, guide downloads, sequence sends, daily briefings. Comes from your domain. Tracks opens and clicks.
4. Stripe
Payments. The customer pays Stripe, Stripe pays you. After every purchase, Stripe pings your edge function so the welcome email goes out and the customer is provisioned without you doing anything.
Four real flows in your business
Flow 1: Someone downloads your free guide
Form on your site → edge function writes them to Supabase → Resend sends the guide → a database trigger enrolls them in your welcome sequence → the hourly cron picks up the next email and sends it.
Flow 2: Someone signs up for your event
Form → edge function → Supabase insert → Resend sends confirmation → trigger enrolls them in your event nurture sequence.
Flow 3: Someone buys your course
Stripe handles payment → pings your edge function webhook → that creates a Supabase auth user, writes to course_purchases, asks Resend to send a welcome with magic password link, and creates an email_tracking row. All in under a second.
Flow 4: Your sequences run on their own
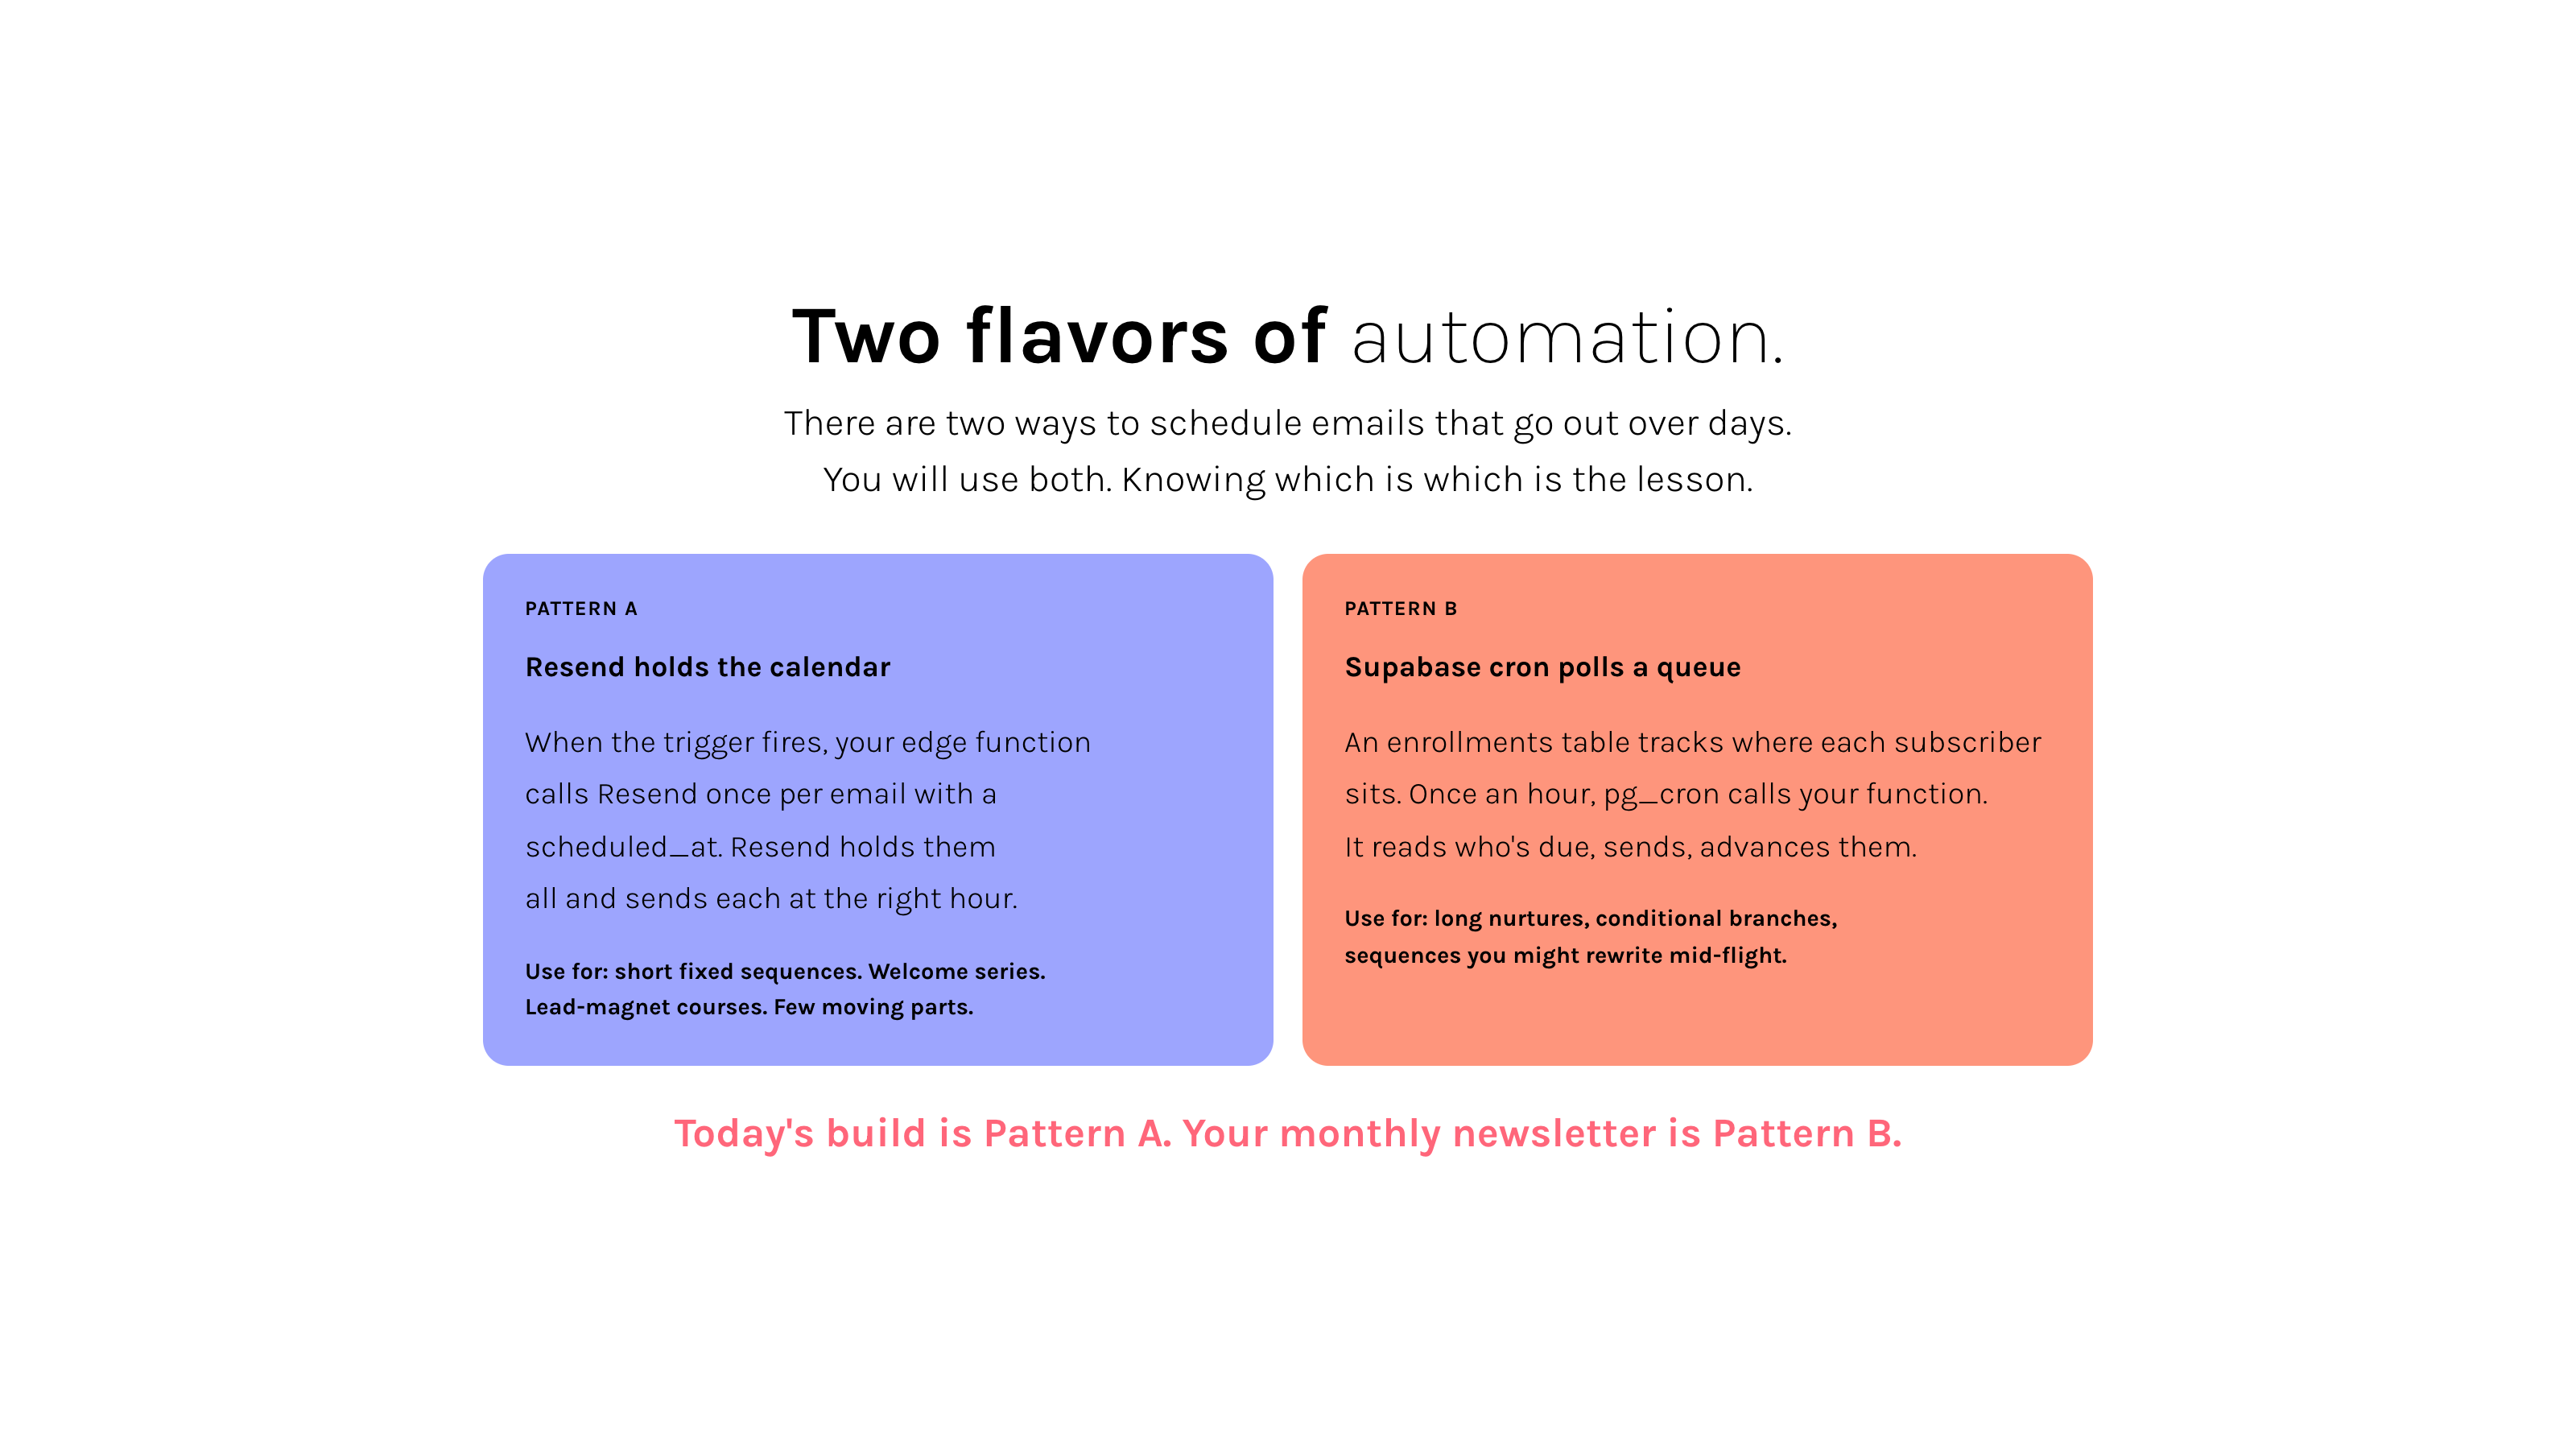
There are two ways to schedule emails that go out over days or weeks. You will use both, depending on the sequence.
Pattern A · Resend holds the calendar
When the trigger fires (someone confirms, buys, signs up), the edge function calls Resend once per email with a scheduled_at for each. Resend holds them and sends each at the right hour.
Use for: short fixed sequences (welcome series, lead-magnet courses). Few moving parts. The whole calendar is set the moment the user confirms.
Pattern B · Supabase cron polls a queue
An enrollments table tracks where each subscriber is in a sequence. Once an hour, Supabase pg_cron calls your edge function. The function reads who is due now, sends through Resend, advances each enrollment to the next step.
Use for: long-running nurture, conditional branches, sequences you might pause or rewrite mid-flight. You can change next week's email today.
Rule of thumb: if the sequence is short and fixed, Pattern A. If it lives on for months and might change, Pattern B. A short lead-magnet welcome series is Pattern A. A monthly newsletter cadence is Pattern B.
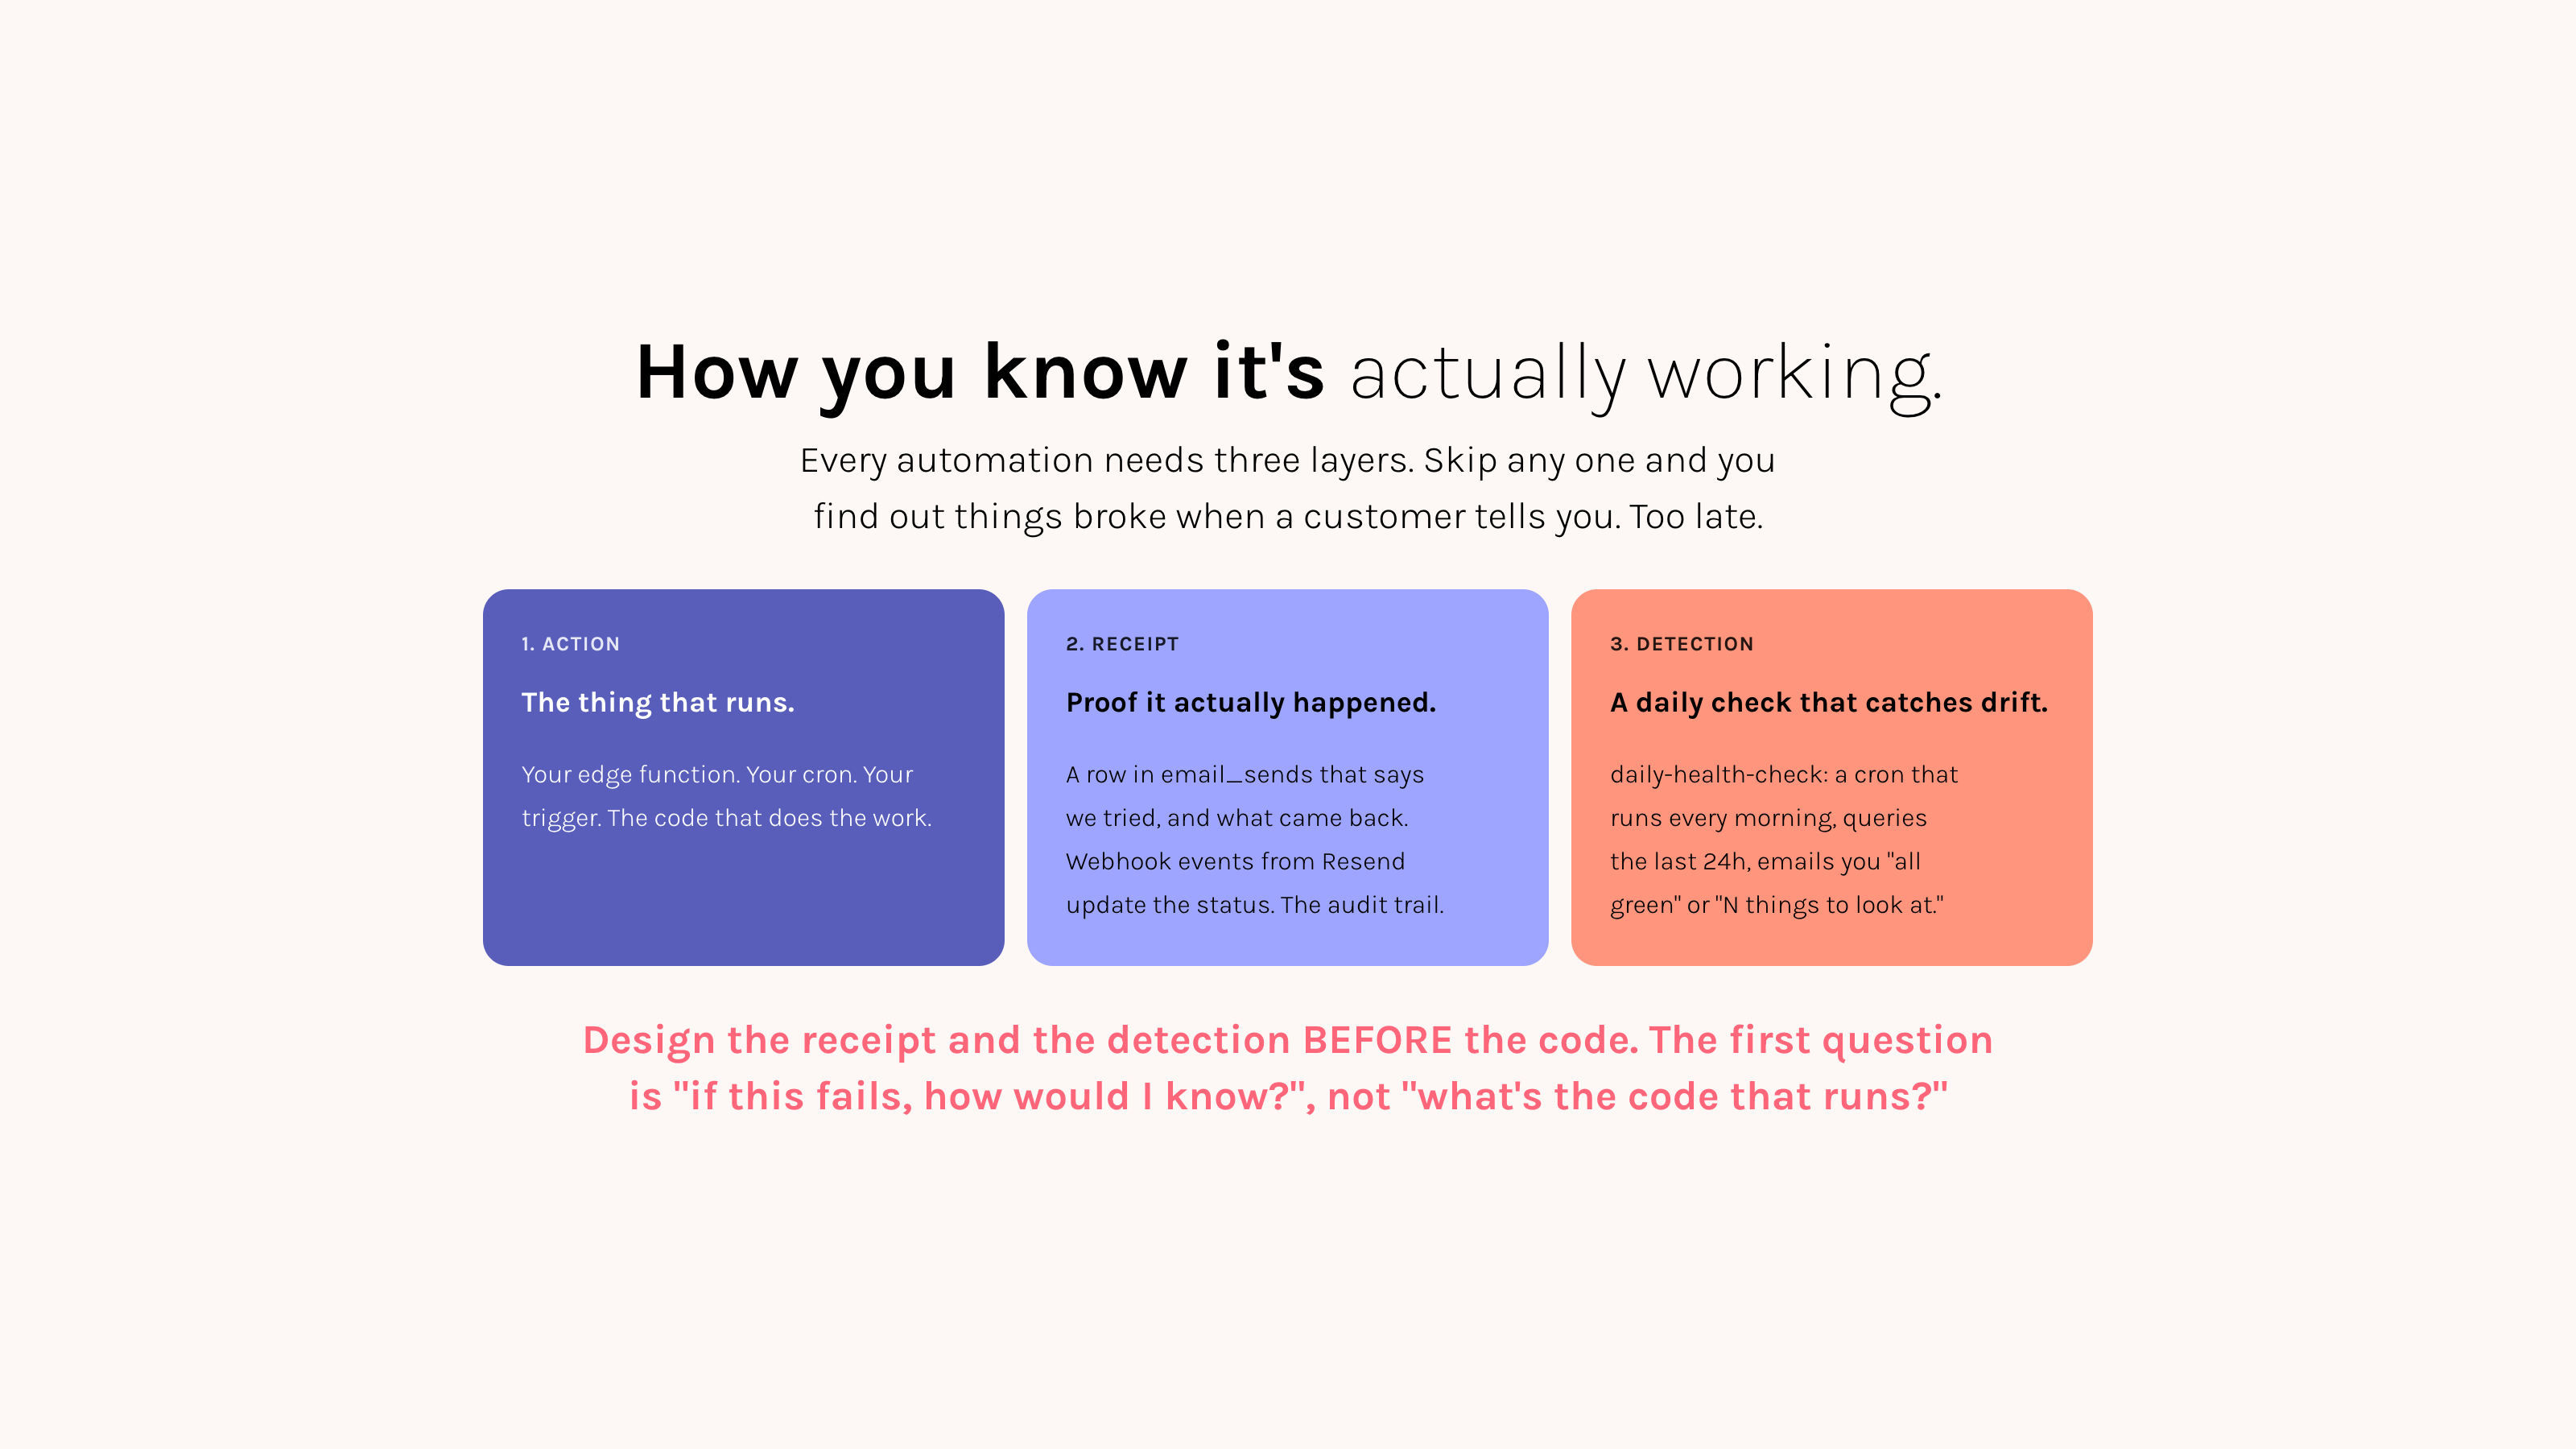
The non-negotiable: Action, Receipt, Detection
Every automation you build has three layers, and you ship all three or you ship none. Skip any one and you'll find out something is broken when a customer tells you.
1. Action
The code that runs. The function, the cron, the trigger.
2. Receipt
A row in Supabase that says "we tried, here's what happened." For emails: email_sends.
3. Detection
A daily query that surfaces drift. A morning email if anything went wrong yesterday.
When you design any new automation, the FIRST question is "what's the receipt, and what query catches the failure?", not "what's the code that runs?" That's the difference between an automation that runs the business and one you have to babysit.
The pattern
Your website never talks to your database directly. It always goes through an edge function. Edge functions are where your secrets live, where webhooks land, and where scheduled work happens. Supabase is the engine. Resend is the voice. Stripe is the till. Read the rest of the lessons to set them up one at a time.
A moment with this
Of the four flows above, which one is most alive in your business right now? Lead magnet downloads? Event signups? Course purchases? Pick one. The week ahead becomes much simpler if you build for that flow first.
Go deeper
Want the full architecture overview before any setup? Tell Claude: "give me the root system overview". It will read the overview from your pack and walk you through how every piece connects.
📖 Glossary: tap to expand the words you will see in this module
None of them are complicated. Skim once, refer back when you forget.
API
A way for one program to ask another program for something over the internet. When your edge function "calls the Resend API", it sends Resend a message that says "send this email." Resend's servers do it and send back a result. You don't see this happening. APIs are how every tool on the internet talks to every other tool.
Edge function
A small piece of code that lives inside your Supabase project. It sleeps until something calls it (a form submission, a webhook, a scheduled time), then wakes up, does one job, goes back to sleep. Your website never talks to your database directly. It always goes through an edge function. That's where your secrets live safely.
Webhook
A message one service sends to another when something happens. When someone pays you on Stripe, Stripe immediately sends a webhook (a tiny POST request) to your edge function saying "this person just paid." Your function reads it and reacts: send the welcome email, create the login. You're not asking Stripe "did anyone pay?". Stripe is telling you, the moment it happens.
Secret
A string of random characters that proves you are you. API keys (Resend's re_xxx, Stripe's sk_live_xxx) and signing secrets (whsec_xxx) are all secrets. Keep them out of git. Out of the browser. Only inside Supabase's secret vault. If one leaks, anyone who finds it can pretend to be you.
Signing secret (and "HMAC")
A specific kind of secret used to PROVE a webhook actually came from Stripe (or Resend, or whoever) and not a stranger pretending. The sender uses the secret to make a signature attached to the message. Your function uses the same secret to recompute the signature. If they don't match, it rejects the request. "HMAC" is the math that does it. You don't need to understand the math. Just know that without it, anyone could fake a purchase.
Environment variable (env var)
A configuration value the code reads at runtime instead of being hardcoded. Your sender email, your domain, your Stripe keys are all env vars. The same code can run on your laptop with one set of values and in production with another. The functions that ship with this pack read every brand-specific value from env vars, so nothing about you is hardcoded.
CORS
A safety check browsers do. Without it, any random website on the internet could call your edge function from someone's browser. CORS lets you say "only my own website is allowed to POST to this function." If your form stops working with a browser error mentioning "CORS" or "Access-Control-Allow-Origin", that's the allowlist not matching your domain. The fix: tell Claude "fix the CORS allowed origin on [function name] to match my live domain," then redeploy that function.
RLS (Row Level Security)
A Supabase rule per table that says "only show me rows for my user." With RLS on, even if someone steals your public anon key, they cannot read other people's data. With RLS off, anyone with that key can read everything. Tables in your pack ship with RLS on by default. Don't turn it off without thinking carefully.
GDPR
European Union privacy law. Applies if you operate from the EU or sell to anyone in the EU (which is most online businesses). The basics: get explicit consent before emailing people, give them a one-click unsubscribe, store their data in a place you can find and delete on request, log every consent change. Hosting your database in an EU region, double opt-in, the unsubscribe, and the consent_log functions you deploy give you the building blocks. You still set them up and stay responsible for compliance yourself. None of it is compliant by default.
CLI (command-line interface)
A tool you run by typing in your terminal instead of clicking in a UI. The Supabase CLI is what Claude uses to deploy functions and run migrations. You don't need to memorize commands. Claude does that for you.
Where to host (and register your domain) 🖥️
Watch: Squarespace and Wix can't do this (0:55)
Before any of the rest of this module works, you need two things: a place to put your website, and a domain name pointing at it. Most students fold both decisions into a single afternoon. The choices below cover both.
The fork in the road
There are two fundamentally different ways to put a website online. The course teaches one of them. If you are already using the other, the rest of this module will not apply to you.
🚨 Everything you upload is public
A web host's entire job is handing your files to anyone who asks for the URL. Every page arrives in the visitor's browser as full, readable code. Right-click any website and choose View Page Source to see this for yourself; your bank's site ships readable code too. This is how the whole web works, and it is safe by itself.
It only goes wrong if a page carries something that should never travel: an API key, a password, a client's email address. The rule that keeps you safe through this entire module: pages carry presentation, servers carry secrets and personal data. The Supabase lesson, two lessons from here, shows where the real locks live.
Path 1: You upload HTML files (this course)
Your website is a folder of files Claude wrote for you. You hand those files to a hosting provider and they serve them to visitors. Cheap, fast, fully owned by you. No monthly software subscription. No platform that owns your content. Pick one of the options below.
Hostinger (~$3-4/mo, bundles domain)
Best for: people newer to technical work who want it bundled. Domain registration, hosting, and email at your domain all in one bill. Drag-and-drop file manager. What this course recommends as the default. What thefourlanguages.com runs on.
Deploy: a one-line ./deploy.sh script using rsync over SSH. Ask Claude: "set up my Hostinger deploy script."
Cloudflare Pages (free, unlimited bandwidth)
Best for: anyone comfortable with GitHub who wants truly free. Push to GitHub, your site rebuilds automatically. Fastest CDN on the internet. No bandwidth limits. You buy your domain elsewhere (Cloudflare Registrar pairs perfectly).
Deploy: git push. Cloudflare detects the push and rebuilds. No script needed.
Netlify (free tier, 100GB bandwidth)
Best for: people who want preview URLs to share work in progress. Same git-deploy idea as Cloudflare. Branch previews are the standout feature.
Deploy: git push, or netlify deploy --prod from the CLI. No script needed.
Vercel (free tier, 100GB bandwidth)
Best for: people who'll build a Next.js app eventually. Same idea as Netlify. Overkill for static HTML. Skip unless you have a specific reason.
Deploy: git push, or vercel --prod from the CLI.
GitHub Pages (free if repo is public)
Best for: personal sites or portfolios where source code can be public. Private repos require GitHub Pro at $4/mo. At that price, Hostinger gives you more.
Deploy: git push to the configured branch (usually main). No script needed.
Namecheap shared hosting (~$2/mo, bundles domain)
Best for: budget-first decisions. Cheaper than Hostinger, slower, older UI. The dollar saved is not always worth the friction.
Deploy: rsync or FTP, same shape as the Hostinger script. Ask Claude: "set up my Namecheap deploy script."
Where to register your domain
If you picked a host that bundles registration (Hostinger, Namecheap shared hosting), you can buy the domain from the same place as your hosting. One bill, one login, one DNS panel. Skip the section below.
If your host does not include domain registration (Cloudflare Pages, Netlify, Vercel, GitHub Pages), you buy the domain separately, then point its DNS at your host. The standalone registrars below all give you free DNS management. That is where you will later add SPF, DKIM, and DMARC records for email (next lessons in this module).
Cloudflare Registrar (~$10/yr, at-cost)
Cheapest, most technical-friendly. Sells domains at wholesale price with no markup. Free WHOIS privacy, free DNS, no upsells. Pairs perfectly with Cloudflare Pages hosting. If you bought a domain elsewhere first, you can transfer it after 60 days.
Namecheap (~$10-15/yr)
Simple and reliable. Free WHOIS privacy. Clear DNS panel. Fair pricing. The default for most indie operators who want to keep registrar and hosting separate.
GoDaddy (~$12-20/yr)
Most popular, often promo pricing then renewal increase. Free WHOIS privacy. Decent DNS panel. Watch for upsells at checkout (most are unnecessary). Fine if you already have a domain there. Otherwise Cloudflare or Namecheap costs less long-term.
Porkbun (~$10/yr)
Indie favorite. Same idea as Namecheap, slightly different name. Free WHOIS privacy, free SSL, simple DNS panel. Fine choice, less name recognition.
If you bundled with Hostinger, you are done. Domain registration and DNS are already in your dashboard. If you went standalone: Cloudflare Registrar for cheapest at-cost pricing, or Namecheap if you want the simplest interface. Skip GoDaddy unless you already use it.
Path 2: A platform builds the site for you
You can use these, but...
If you are on one of these platforms (Squarespace, WordPress, Wix) and want to stay, that is a real choice. But you will not be able to create and deploy your website from your root system directly. Your site lives inside the platform's editor, not as files Claude can edit. The rest of the system still works for you (Supabase backend, CRM, email sequences, dashboard), you just skip the website lessons.
Squarespace ($16-49/mo)
Drag-and-drop builder. Beautiful templates. You build inside their editor, no way to upload HTML files. Strong choice if you are never going to write code.
WordPress.com ($4-45/mo)
Hosted WordPress run by Automattic. Same constraint as Squarespace: you work in their interface, not files. Plugin access depends on plan.
WordPress.org (self-hosted)
The "real" WordPress. Free open-source software you install on Hostinger, Bluehost, or SiteGround. Becomes a PHP application with a MySQL database. The website Claude builds is static HTML, architecturally different. Going this route means your website lives in WordPress, not as files Claude wrote.
Wix ($16-39/mo)
Drag-and-drop. Heavier on features than Squarespace. Strong for service businesses (salons, restaurants, gyms) that need booking flows.
Webflow ($14-39/mo)
Designer-focused. Visual editor that produces real HTML/CSS underneath. Lets you export the code and deploy to a Path 1 host. The hybrid option.
Carrd ($9-49/year)
Single-page sites only. Useful for one-off launch pages or link-in-bio replacements. Not a full site.
If you are new and want it bundled: Hostinger. If you are comfortable with GitHub and want truly free: Cloudflare Pages + Cloudflare Registrar. You can always migrate later. The HTML files do not change, you just point your domain at the new host.
Go deeper
Once you have decided, tell Claude what you picked: "I am going with Hostinger, walk me through the setup" or "set up Cloudflare Pages". It will read the hosting guide and handle the steps with you.
What you decide today
🔧 If you are not sure the domain is pointing at your host
Check this before you move on, because a domain pointed at the wrong place is what makes email verification fail two lessons from now, and there it looks like an email problem rather than a domain one. You will know it worked when your host's dashboard shows the domain as connected or active, with no warning next to it. A fresh change can take anywhere from a few minutes to a few hours to travel, so "not yet" and "wrong" look identical for a while: if it has been under a couple of hours and nothing shows an error, that is normal, wait. If your registrar still lists its own default nameservers rather than your host's, that is the real thing to fix. Screenshot your host's domain page and your registrar's nameserver page, show Claude both, and it will tell you which one is wrong.
Set up your database with Supabase 🗄️
Watch: Leaving with your data (0:51)
Supabase is the place your business remembers things. Session logs, dashboard data, contacts, form submissions, course progress, every moment that needs to outlive a single conversation. Free for what we need here, hosted in the EU, about 20 minutes from nothing to ready.
What it actually is
A place online where your business data lives. Underneath, it is a Postgres database, the same database technology banks and governments use, with a clean dashboard on top. You sign up, your database is ready, you put rows in like a spreadsheet. The same root holds your contacts, your event signups, your dashboard data, your course progress.
Why not HubSpot or Airtable
HubSpot and Airtable are products. They decide the shape, the limits, the per-seat pricing. You rent a room inside their world. Supabase is the foundation underneath. You decide the shape, the fields, the rules. The same database that holds your contacts also holds your event signups, your dashboards, your course progress. With HubSpot you are a tenant. With Supabase you own the building.
Watch: You stop visiting your data (1:03)
Questions before you start
Can I give different team members different levels of access?
Yes. At the organisation level, Supabase has roles (Owner, Admin, Read-only, Billing). At the data level, Row Level Security lets you say "this person sees only their own rows." Even if someone got into your dashboard, the database itself refuses what is not theirs.
How safe is my client data?
Supabase publishes its security posture: encrypted at rest (AES-256), encrypted in transit (TLS), SOC 2 Type 2, ISO 27001, multi-factor authentication on accounts. Check supabase.com/security for the current list. One honest note: automated daily backups start on the paid plans, so on the free tier you export your own copy (one CLI command, worth putting on a schedule). A stronger baseline than the usual places solopreneurs keep client data (a Google Sheet, a Notion page, a folder on a laptop), and still yours to configure and keep safe.
Is the free tier enough?
For most solopreneurs, comfortably. 500 MB of database (hundreds of thousands of contact rows), unlimited API requests, 5 GB of bandwidth. Free projects pause after a week if literally nothing touches them. Any normal use of your live site keeps it active. A signup form submission, a dashboard page load, a logged-in visit, all count.
What does "paused" actually mean?
The whole project, not individual tables. The database goes offline as a unit until you click "Restore" in the dashboard. One click, takes a minute, nothing is deleted. While active, your signups and queries work normally even if a week passes between them, as long as something else is touching the project.
GDPR for an EU-based business?
Pick an EU region (Frankfurt or Ireland) when you create the project if you want your data held in the EU. Sign Supabase's Data Processing Agreement from your dashboard. Write a privacy notice for your clients explaining what you store and why. That covers the storage layer, and only that layer: none of it makes your business GDPR compliant by itself, and the AI side is a separate question. The Privacy & GDPR module in Get Set Up walks through the rest.
Do I need to know SQL?
No. The dashboard has a Table Editor that looks and behaves like a spreadsheet. Click to add a column, click to add a row. SQL becomes useful when you want to ask questions across your data, and even then Claude writes it for you.
What if I outgrow it. Can I leave?
Fully. Supabase is Postgres, the most portable database technology there is. One CLI command exports everything as a standard SQL file that any other Postgres host will import. No proprietary format. No lock-in.
Before this works: you need two small command-line tools (Supabase CLI + Deno) installed once. Tell Claude "install the CLI tools I need for this module" and it handles them in a minute. Once.
What you will do
supabase login (it opens a browser to authorize your account), then supabase link to connect your local project to the cloud database. It asks for your project ref, which is in your dashboard URL. If link fails with an auth error, you skipped the login..env holds what your own machine uses (your Supabase URL and keys), and it is shared with your other modules, so you add lines to it rather than replacing it. supabase/functions/.env holds only what your edge functions need (Resend, Stripe, your sender details), and that is the file uploaded to Supabase as secrets. Neither is ever committed to git. The setup skills write each value to the right file for you, which also keeps the keys Resend and Stripe show only once out of a text editor.🔧 How you know these four landed
Your project shows Active in the Supabase dashboard, and supabase link prints your project ref back at you. Step 3 is the one that fails quietly: if you skipped it, nothing errors, your login and magic links simply do nothing, and the fix is to add your site URL under Authentication, URL Configuration, Redirect URLs. If a command fails, paste the whole error to Claude. Nothing is live yet, so nothing is broken and nothing is lost.
A moment with this
If your customers, partners, or contacts are mostly in the EU, EU Frankfurt is the only sensible region. If your audience is mostly elsewhere, you can pick a US region. Pick once, on day one. Migrating regions later is hours of work that buys nothing.
Go deeper
Ready to set it up? Tell Claude: "let's set up Supabase" or "set up my database". It will walk through the project creation, the linking, the auth toggle, and storing your secrets safely.
Once it is live, one more ask: "make me a /backup skill that exports my database to a dated file". One command (built on supabase db dump) writes your whole database into a file inside your project folder. Run it at the end of each week, and you always leave with your data, whatever happens to the project.
Choose your email home 📬
Watch: Choose your email home (0:42)
Before you set up email delivery, decide where it lives. You probably already use a platform: Substack, Beehiiv, Kit (formerly ConvertKit), Mailchimp, Flodesk, something. The next lesson will show you how to send email through your own system using Resend. This lesson decides whether you should.
The honest answer for most of you is hybrid. Keep your platform for what it is good at. Build your own only for what only your own system can do. This lesson tells you which is which.
What your platform does that you cannot see
Three layers of magic make a polished newsletter platform feel "easy" that you take for granted.
1. Send-time email rendering pipeline
Email clients (Gmail, Outlook, Apple Mail) are stuck in 2010. They strip web fonts. They strip CSS in style blocks. They reject flexbox and grid. Your platform's editor renders modern visuals on screen, then at send time runs an invisible pipeline that inlines every style on the element itself, replaces your brand font with a fallback stack (Karla becomes Arial when Karla is not loaded), converts your layout to old-school HTML tables, caps width at 600 pixels, and hosts every image on the platform's CDN. Without that pipeline, your email arrives broken: ugly fallbacks, busted layout, missing images.
2. Deliverability infrastructure
SPF, DKIM, DMARC records on your sending domain. Bounce handling. Suppression lists so unsubscribed users do not get re-added by accident. List-Unsubscribe header (the one Gmail uses to show "unsubscribe" at the top of the message). Sender IP reputation. Spam testing before send. None of this is glamorous. All of it is what gets your email out of spam.
The unsubscribe path deserves one real test. Four traps pass every code review and fail the moment a person clicks: a page wired to a different endpoint than the one your token was signed for (each unsubscribe then fails politely, forever), a List-Unsubscribe header pointing at a page instead of a processing endpoint (Gmail's one-click POSTs into the void), a tokenless link in your internal reports, and per-type opt-outs that silence someone who re-signed up later. The Resend setup guide in your Repo (guides/15-resend-setup.md) walks through all four. The check that catches them: open the unsubscribe link from a real sent email, and read the database row it wrote.
3. Compliance plumbing
GDPR consent log. Double opt-in flow when you switch it on. Hard bounce removal. Unsubscribe audit trail. Privacy policy linkage. If you operate from the EU or sell to EU residents, this is the plumbing that keeps your email on the right side of consent rules (the Privacy & GDPR module has the legal background).
When you build your own system, none of this is automatic. You build it.
What "you build it" looks like: the leaving page
Someone clicking unsubscribe might want everything to stop, or might just want the one series that got too heavy this month. A platform gives you a single button for both, so the second person leaves entirely. When you own the plumbing you can offer the smaller answer too.
Below is the live page on this site, reached from the footer of the emails you get from us. Each line is a separate series you can stop on its own, and the page asks the server first, so a series you were never enrolled in is dimmed rather than offered. The red button stays in plain sight for anyone who wants it.
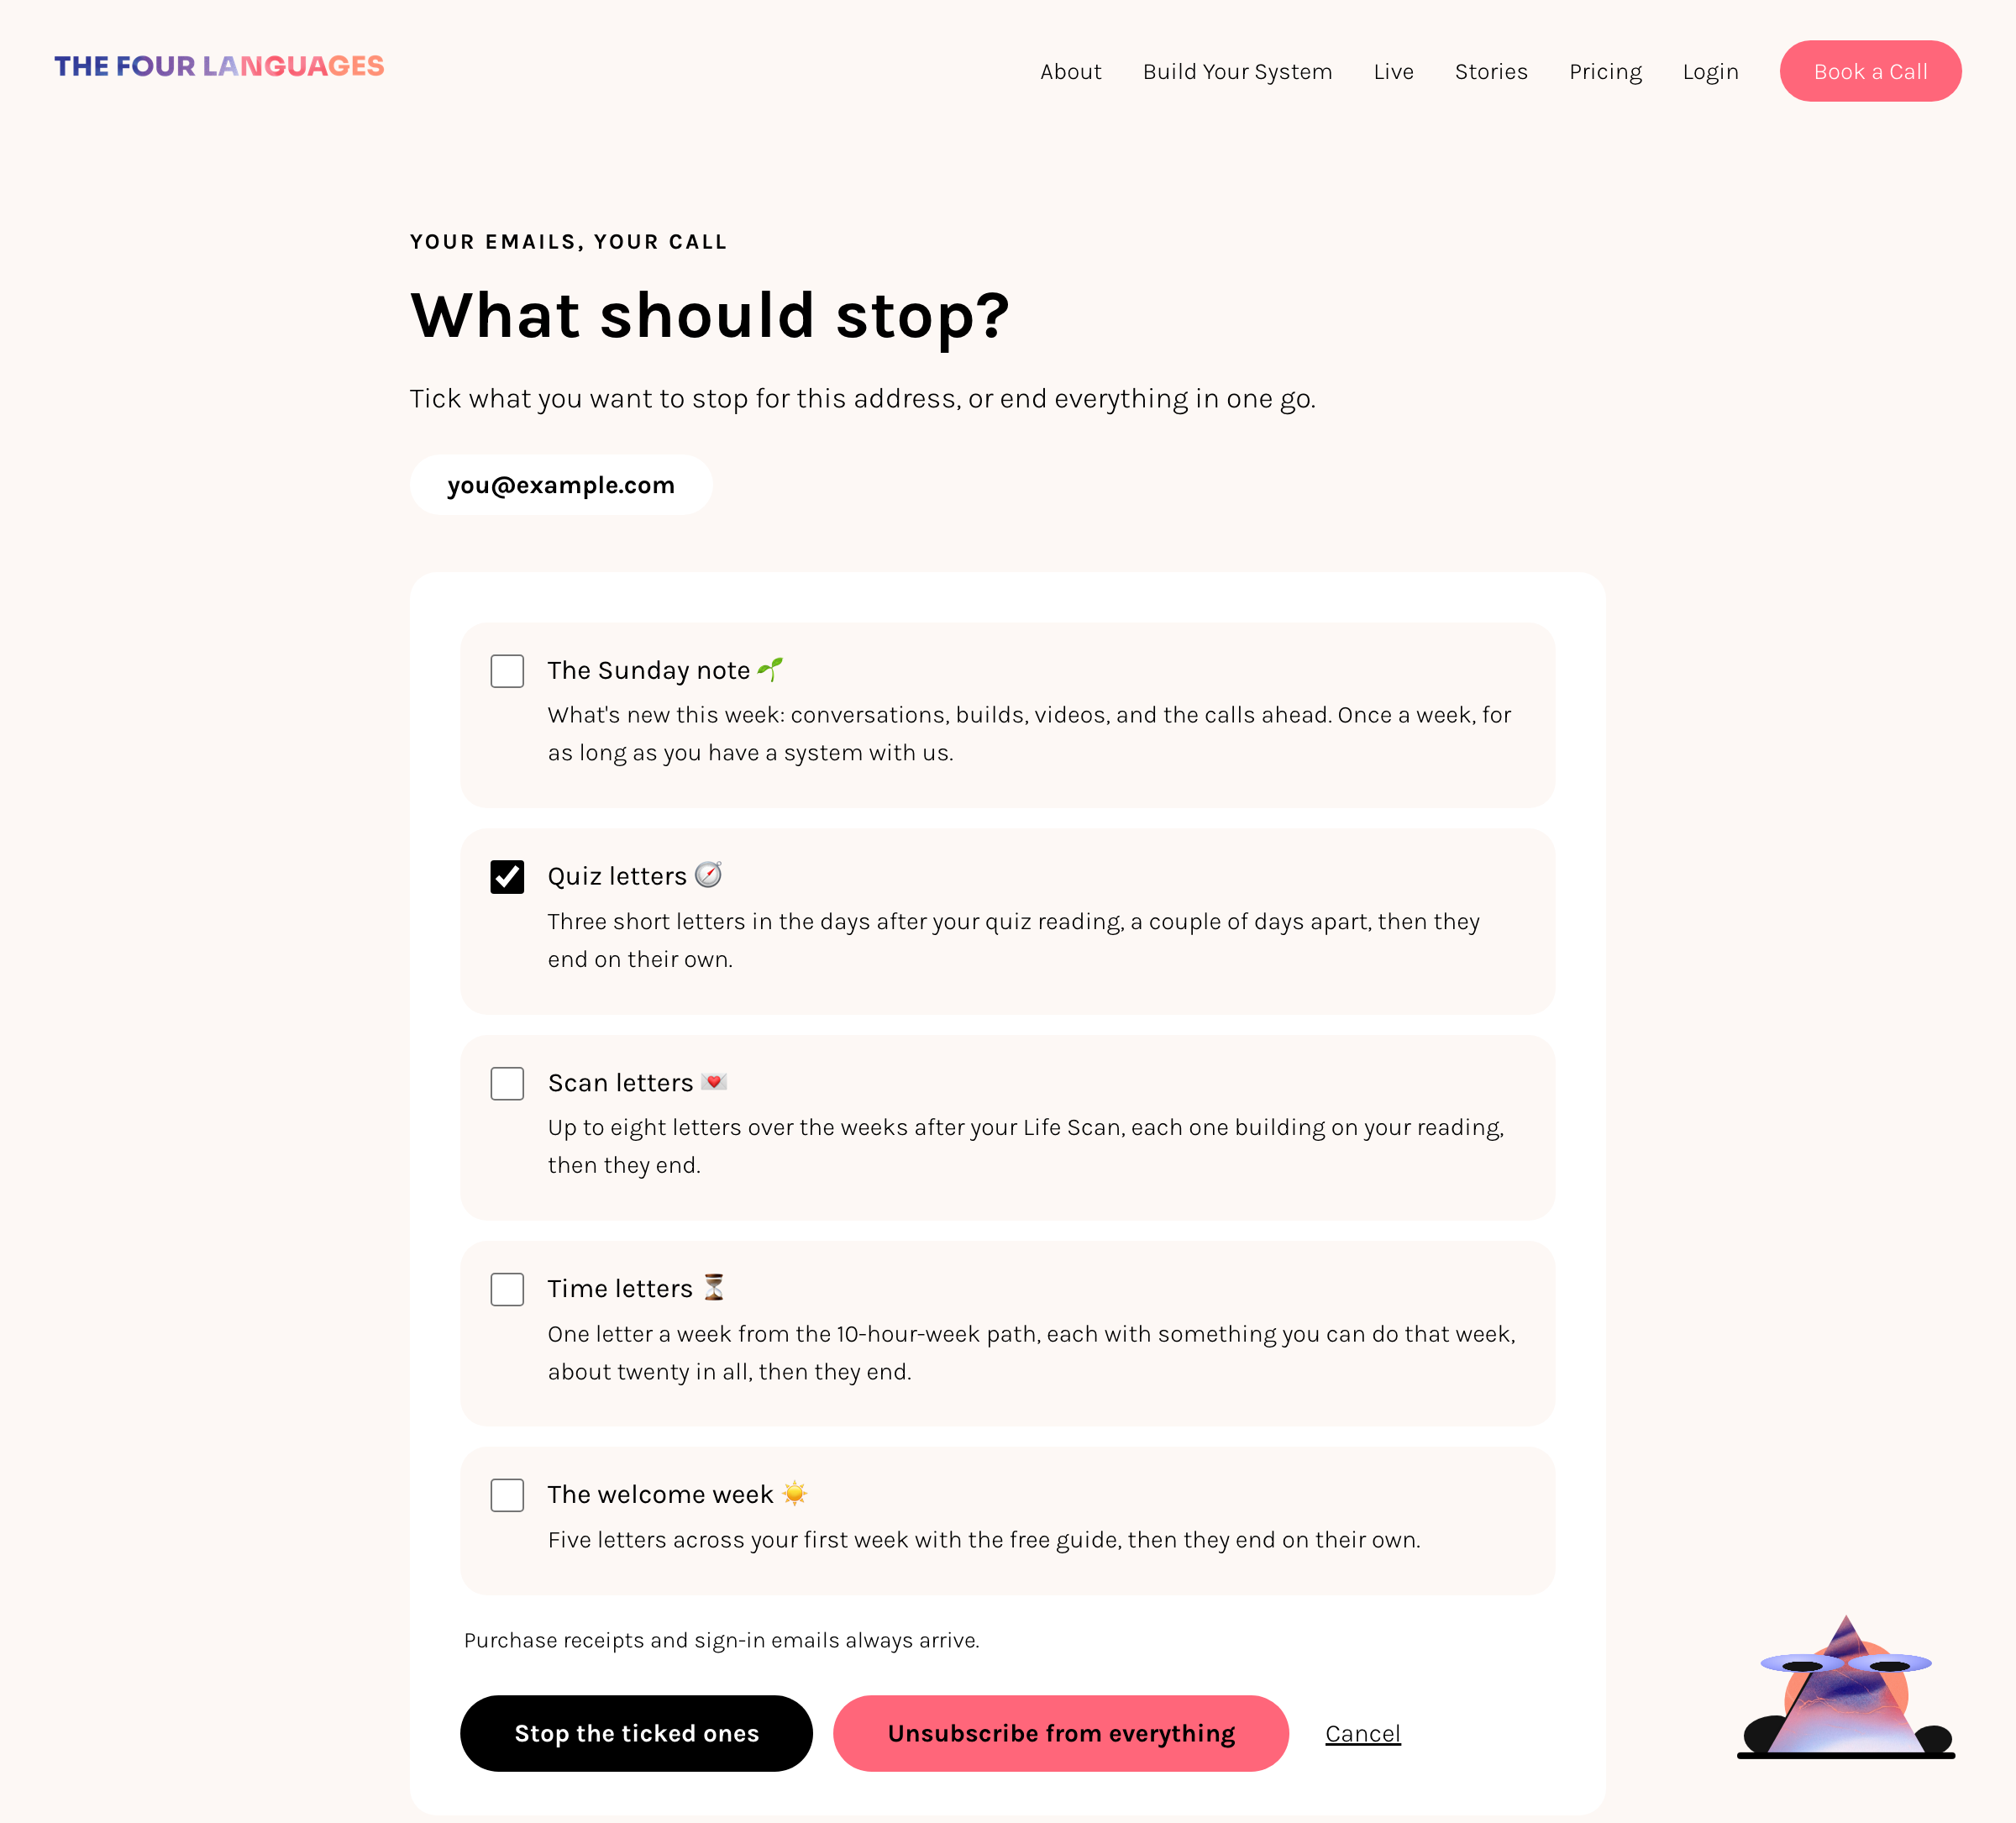
This one is in your Repo, in the neutral template palette with two example series to replace. It ships in both the Module 5 and Module 6 packs at the same path, body/website/unsubscribe/index.html, so if you have both, the second one to install finds the file already there and leaves yours alone. The same guide (guides/15-resend-setup.md) covers what to fill in, and the trap that makes a per-type opt-out silence someone who signed up again later.
The platforms, side by side
Each one trades something for something else. There is no "best." There is only what fits the work you are actually doing.
Substack
What it is: writing, publishing, and discovery platform with a built-in social network. Now handles newsletters, podcasts, video, and live streams from one editor. Discovery comes from the Substack Network.
You get: multiple post formats in one editor (article, podcast, video, live stream, static page), native podcast hosting with auto-RSS to Apple Podcasts and Spotify (plus AI text-to-speech narration of written posts in six voices), native video hosting plus live streaming with auto-distribution to YouTube and LinkedIn, the Substack Network for discovery (cross-publication recommendations, Notes feed, category leaderboards, semantic search), reader referrals with milestone rewards, paid subscriptions with trials, gifting, and group plans, post-level access control (free, free-subs only, paid, founding), drip campaigns triggered by subscriber lifecycle events (new free sub, new paid, founding upgrade, churn), targeted ad-hoc emails to subscriber segments, custom CSS for emails, A/B headline testing, public web pages for every issue (indexed for SEO), comments on each post.
You lose: brand control (the URL says substack.com, the design is mostly Substack's), tag-based subscriber model (no proper tags, just lifecycle states), tag-driven conditional automations, robust API (limited and mostly read-only), engagement data ownership (you can export the list, but reads and clicks live with Substack).
Best for: writers and multi-format creators (newsletter plus podcast plus video) whose primary growth lever is the Substack network, or who want public web pages indexed for SEO.
Beehiiv
What it is: newsletter platform with podcast hosting, web builder, and built-in monetisation, all in one. Built by ex-Morning Brew people. Strongest of the consumer-grade tools for direct ad revenue.
You get: the Beehiiv Ad Network (real advertisers paying you per send. Standout feature vs every other platform on this page), Boosts (paid recommendations between newsletters), podcast hosting and distribution alongside your newsletter, web builder for branded archive pages on your own domain, paid subscriptions, referral programs, recommendations network, polls embedded in emails, conditional automations that branch on poll answers and reader behaviour (someone clicks "yes" on a poll, they go down path A; "no" goes down path B), segments that update dynamically based on actions, RSS-to-send, multiple newsletters per account, robust API for sending and reading subscribers, real analytics (open by issue, click, growth), survey forms.
You lose: the Substack social ecosystem (different network, different reader culture), Kit's deep tag-based subscriber model, Flodesk's custom-font upload.
Best for: growth-focused creators monetising via ads or sponsorships, running a podcast alongside a newsletter, using polls and behaviour to personalise each reader's next email.
Kit (formerly ConvertKit)
What it is: the long-time creator email platform. Strongest visual automation engine of the consumer-grade tools.
You get: Visual Automations (drag-and-drop conditional logic, the flagship and most flexible if-this-then-that of any platform here), tag-based subscriber model (one subscriber, many tags, very flexible), Sequences for drip campaigns, Broadcasts for one-offs, native Commerce (sell digital products directly with Kit handling the checkout and delivery), apps marketplace with creator integrations (Transistor.fm for podcasts, SavvyCal for booking, Broadcast Boost), landing pages and forms with custom fields, Liquid templating in emails for real personalisation, robust API, free migration service from any other platform if you are on a paid plan, consistently strong deliverability.
You lose: visual polish (the editor is functional, not Flodesk-beautiful), public web archive (minimal), network-driven discovery (none built-in, you bring your own audience), native podcast hosting (Transistor app integration only).
Best for: businesses where the email IS the product (courses, coaching, info products, digital downloads) and where automation depth and tag-based personalisation matter more than visual design.
Mailchimp
What it is: legacy general-purpose marketing platform owned by Intuit since 2021. Has expanded beyond email into a full marketing suite (websites, ads, CRM).
You get: Marketing Automation Flows (Customer Journey Builder), Behavioral Targeting, Generative AI for body copy and subject lines, Send Time Optimization (AI predicts the best send time per recipient), Dynamic Content (personalise content blocks per recipient), Predictive Demographics, full Website Builder and Landing Pages, A/B Testing, Marketing CRM, Tags and Customer Profiles, Smart Recommendations, Retargeting Ads (run paid ads from inside Mailchimp), Transactional Emails, Webhooks, Surveys, Content Studio, deep integrations with Canva, Salesforce, Shopify, Instagram, Google Analytics.
You lose: pricing scales aggressively as your list grows, the brand has aged into "small business" rather than "creator" territory, deliverability can be inconsistent on the free tier, no native podcast hosting.
Best for: small businesses with an existing Mailchimp setup, e-commerce stores wanting integrated retargeting, teams that want one tool for email plus landing pages plus ads plus CRM.
Flodesk
What it is: design-first email platform. Patented layout system, custom font upload, beautiful templates. Pricing scales by subscriber count.
You get: custom fonts uploaded directly into the editor (rare among email tools, where your brand font actually shows where supported), brand color palette baked in, patented layout system for in-email graphics with no third-party design tool needed, countdown timers that match your brand, polls embedded in emails, Link Actions (segment subscribers and trigger automations when they click any link), workflows with visual builder, abandoned cart automation, Forms and Landing Pages and Sales Pages, audience segmentation, email analytics and reporting, plays well with Squarespace, Showit, Shopify.
You lose: automation depth versus Kit (workflows are nice but shallower than Kit's visual builder), tag complexity (simpler model than Kit), custom HTML import (limited), API (basic), Substack/Beehiiv-style network discovery (none).
Best for: brand-led businesses (designers, photographers, wedding industry, lifestyle, course creators with a strong visual brand) where the email's design IS part of the product.
Build with your own system (Resend + Supabase)
What it is: not a newsletter platform. A transactional email API plus your own database. The next lesson sets it up.
You get: total control (every email is your code, every subscriber is your row), real-time triggers (user did X, send email Y) with full conditional logic, multi-step sequences with branching that depends on database state, costs scale with usage rather than list size (Resend covers 3,000 emails per month free, then $20 per month for 50,000), data lives where you live (your Supabase project), a full consent log built in and EU hosting available, no platform lock-in.
You take on: the send-time rendering pipeline (you write email-safe HTML, see below), deliverability infrastructure (SPF, DKIM, DMARC for your sending domain), suppression management (your bounces, your unsubscribes, your job), HMAC-signed unsubscribe tokens, bounce webhooks, click and open tracking, list management UI (Resend has none, you read your own database).
Best for: people who already run on Supabase, who have transactional emails to send (purchase confirmations, lead-magnet sequences, automated onboarding), and who want their CRM and email database to be the same row.
Three patterns for choosing
Hybrid (most common, recommended for most)
Keep your newsletter platform for broadcasts: newsletters, announcements, content. Build with Resend for transactional: purchase emails, lead-magnet sequences, post-event reminders.
Why this is usually right: broadcasts benefit from the platform's send-time pipeline, design tools, audience growth features, list-management UI, and deliverability reputation. Transactional benefits from being native to your system, triggered by real events, recorded in your own database. Most professional setups look exactly like this.
Replace selectively
Move one specific use case from your platform to your own system. Most common: lead-magnet sequences, post-purchase onboarding, multi-touch nurtures triggered by behavior.
Reasons to replace selectively: the sequence needs to react to data only your system knows (course progress, app usage, dashboard activity), the sequence needs to update CRM data as it sends (mark someone "engaged" when they reply), or the trigger fires from a Stripe webhook or app event your platform cannot see.
Replace fully
Move everything, including broadcasts.
Reasons to consider: you are very EU-GDPR strict and want full data residency control, your "newsletter" is small and intimate (under 300 people) and you want zero platform overhead, or you genuinely hate the platform you are on and the editor is the daily drain. If you go this route, you take on the whole rendering pipeline. The next section names what to consider.
If you replace your platform: what your platform was doing for you
If you decide to send branded emails through Resend yourself, here is what you take on. None of these are hard. They are simply not free.
The next lesson sets up Resend itself. You build proper multi-step sequences in Module 7, with a dedicated email-sequence skill that handles all of the above for you. For now, the confirm-email function already fires a simple welcome sequence when someone confirms, so you have the shape of it without writing sending logic yet.
How to use Claude WITH your platform (the hybrid play)
Most of you will land on hybrid. Here is how Claude actually helps inside your platform without forcing you to leave it.
Pattern 1: Analyze your platform performance
Export your subscriber list and your last 10 issues' performance from your platform (every platform supports CSV export). Drop the CSVs into your root system. Ask Claude:
"Read the CSVs in heart/content-hub/newsletter-exports/. Tell me my open rate trend over the last 10 issues, my best-performing subject lines, the type of content that gets the most clicks, and the segments of subscribers I should send more or less to."
Pattern 2: Write the body in your voice, format inside your platform
Open your platform's editor. Before you type a word, ask Claude:
"I want to write a newsletter about [topic]. The angle is [angle]. Read my voice guide and my recent issues, then draft a 350-word body in my voice with a real hook, two concrete examples, and one specific ask at the end."
Claude drafts. You paste into the platform's editor (the platform's send-time pipeline handles the rendering). You tweak the formatting in the platform's UI where the design lives.
Pattern 3: Generate the visual asset, not the layout
You want a custom image at the top of your issue. The platform's stock images are bland. You generate a brand-aligned image with Claude (the /ai-image skill, or another image tool you trust), save the file, upload through your platform's image picker. Use the platform for layout. Use Claude for the asset.
Pattern 4: Generate the sequence outline, build inside the platform
You want a 5-email welcome sequence inside Kit. Ask Claude:
"I want to write a 5-email welcome sequence for [audience]. Each email is short, in my voice, no marketing speak. Email 1 sends immediately, then days 2, 4, 7, 14. Draft the sequence with subject line plus body for each."
Claude drafts the copy. You rebuild it as blocks inside Kit's editor (so Kit's pipeline handles the rendering). Slow but bulletproof.
Track every email event in your own system
Whichever platform you use, you can track every meaningful email event in your own root system. The point is to make your dashboard show what your platform alone cannot: cross-platform insight, your own tagging, your CRM-aware view.
Copy the prompt below into Claude. Adapt the part in [brackets] for your specific platforms. Claude will design the tracking schema, build the dashboard view, and walk you through every step.
Do not run two newsletter platforms in parallel. Pick one home for broadcasts. Use your own system for transactional. Decide today, before the next lesson sets up Resend. The decision is real even if it lands at "stay where I am" (which counts).
Brand your emails for the inbox 💌
If you decided to send emails through your own system, you take on the rendering pipeline that platforms like Kit and Beehiiv hide from you. This lesson is the missing manual: how to put your brand in the inbox so it actually shows up the way it does on your website.
Email clients are not browsers. They strip your CSS, ignore your fonts, refuse your images, and break your layout if you let them. What follows is the floor for every branded email you ship.
The one rule that explains everything else
An email is HTML that fetches everything else over the public internet.
Your recipient's email client downloads your HTML, then makes separate requests for every image. If a URL in your email points to your laptop, your own machine, your private Drive, or anything behind a login, the recipient sees a broken image. The image must be reachable by anyone on the internet typing the URL into a browser.
How images actually get into emails
Most students think "I'll just put the image in my project folder." That does nothing. Files in your folder are not internet-reachable. The image needs a public HTTPS URL. Three real ways to get one.
1. Your own deployed website (recommended for logos and recurring assets)
If you have a website folder that gets deployed (most of you do, even if you didn't realize), drop your image into a subfolder, run your deploy, and the file becomes a public URL.
Example pattern: a file at website/email-images/logo.png in your project folder, after deploy, lives at https://yourdomain.com/email-images/logo.png. That URL is what goes in your email's <img src="...">.
Test: paste the URL into an incognito browser tab. If you see the image, every email client can too. If you see a 404, your email recipients will see a broken image.
2. Resend's image upload (best for one-off newsletter hero images)
Resend dashboard has an image uploader. Upload, get a stable URL back, paste into your email HTML. No deploy step. Use this for images that are specific to one newsletter and won't be reused.
Same test: paste in incognito, see the image, you're good.
3. A dedicated image host (Cloudinary, Cloudflare Images, R2, S3)
Overkill for most of you. Useful only if you ship a lot of email or want automatic resizing. Skip until you need it.
What does NOT work
- Local file paths like
/Users/you/Desktop/photo.jpg - Relative paths like
./images/photo.jpg - Files that have not been deployed yet
- Private Google Drive, Dropbox, iCloud links (they require login)
- Base64-encoded images embedded in the HTML (Outlook strips them)
- SVG files (inconsistent client support, especially Outlook). Convert to PNG.
How fonts actually work in emails
You cannot ship custom fonts in email reliably. Most email clients strip <style> blocks (where Google Fonts @import lives) and ignore <link> tags pointing to external fonts. So your custom brand font almost never loads in the recipient's email.
The pattern that works: declare a web-safe font stack with your brand font first as a wish, and a system font as the fallback. Where the brand font happens to be installed (rare), it shows. Everywhere else, the system font shows. Both render reliably.
Stack examples that render everywhere
For warm serif headlines (book/magazine feel):font-family: Charter, Georgia, Times, 'Times New Roman', serif;
Charter ships on every Apple device. Georgia is on every device made in the last 25 years. You always get a real serif.
For modern sans-serif body (clean, friendly):font-family: 'Karla', Arial, Helvetica, sans-serif;
Karla shows where it happens to load (some Apple Mail), Arial fallback elsewhere. Both clean.
For UI labels, footers, eyebrows:font-family: 'Helvetica Neue', Arial, Helvetica, sans-serif;
System sans, looks the same everywhere.
If your brand truly cannot live without a specific custom font (a script font for the logo, a display font for headlines), the answer is to render that text as a PNG image once, host it (see images section above), and embed it. The image is what email clients see. The text is part of the picture.
Brand identity in the inbox: the full toolkit
<img> with explicit width and height. Never SVG.<img>, not background-image.Test before you send (every time)
Send a test version to at least three inboxes that render differently:
Open each. Verify: the logo renders, the layout holds, the fonts fall back gracefully, and the unsubscribe link is visible and clickable. Fix the worst-case render before shipping.
Paste your email HTML and say: "Audit this email for inbox rendering. Check: hosted image URLs, web-safe font stacks, table layout, 600px max width, visible unsubscribe link." Claude will tell you what will break and where.
Set up email delivery with Resend ✉️
Watch: Two flavors of automation (1:30)
Your system needs to send emails: confirmation emails for signups, welcome sequences for new subscribers, transactional emails for purchases. Resend handles this. It is simple, reliable, and free for up to 3,000 emails per month.
Read first: Pick your data residency before you sign up
Resend stores email data in the region you pick when you create the account. The default is US. If you operate from the EU, sell to EU residents, or want your email data held in the EU, switch to the EU region during signup.
Why it matters: changing region after the fact is a hassle. You cannot migrate an existing account between regions. The fix is to create a new account in the right region, re-verify your domain, regenerate API keys, update every Supabase secret, and migrate your suppression list. Hours of work that costs you nothing if you pick right on day one.
Match your residency to where Supabase lives. If your Supabase project is in EU Frankfurt, your Resend account should also be EU. Same logic for US: keep them in the same region so your transactional flow does not cross jurisdictions.
What you will do
RESEND_API_KEY. This is what your custom edge functions (lead-magnet sequences, post-purchase emails, etc.) use to send.resend-webhook function, all email.* events). Set the signing secret as RESEND_WEBHOOK_SECRET. Without this you only know that you called the API, not whether the email arrived.What those DNS records actually do
Resend will give you three TXT records to paste into your DNS. Each answers one question Gmail and Outlook ask about every email arriving in their pipes.
SPF
"Is this server allowed to send mail for this domain?" The record lists who is approved. Resend, Google, anyone else sending as you. Anyone else is a stranger using your name.
DKIM
"Was this email tampered with on the way?" Resend signs every message with a private key. The receiving server checks the matching public key in your DNS. One character changed, the signature breaks.
DMARC
"What should I do if SPF or DKIM fails, and where do I send the report?" Three levels: p=none (watch), p=quarantine (spam folder), p=reject (bounce).
The mental model: SPF and DKIM are the locks. DMARC is the rule for what to do when a lock fails, plus the camera that tells you who tried.
🔧 If verification never completes
You will know it worked when Resend shows a green "Verified" next to your domain. Still pending after a few hours? The records are almost always sitting in the wrong DNS panel: if your domain is registered in one place but hosted in another, the records belong wherever your nameservers point (the hosting side, from lesson 3). Screenshot both your Resend records page and your DNS panel, show them to Claude, and it will spot the mismatch.
📥 Your first sends may land in Promotions or spam. Expect it.
A brand-new sending domain has no reputation yet. Gmail and Outlook build trust by watching real mail from your domain over the first days and weeks, so early sends can land in Promotions or spam even with all three records green. It settles on its own. Send a small, steady trickle to real people rather than a big blast on day one, and when a test lands in spam, drag it to the inbox and reply to it: both teach the filter. Still landing in spam after a few weeks of steady sending? That is the moment to dig deeper, with the DMARC deep-dive below.
📖 Deliverability deep-dive: tap when you want to harden DMARC
The DMARC upgrade path
Most domains ship with v=DMARC1; p=none;. Translation: "I have a record, but if a stranger spoofs me, do nothing." Tighten in three phases.
Phase 1: monitor (today)
v=DMARC1; p=none; rua=mailto:dmarc@yourdomain.com; fo=1
No enforcement. You start receiving aggregate reports. Run for two to four weeks. Free parsers: Postmark DMARC Digests, dmarcian.
Phase 2: quarantine (after reports look clean)
v=DMARC1; p=quarantine; pct=25; rua=mailto:dmarc@yourdomain.com; fo=1
Spammers spoofing you start landing in spam. pct=25 ramps gently. Increase to 100 once stable.
Phase 3: reject
v=DMARC1; p=reject; rua=mailto:dmarc@yourdomain.com; fo=1
Spoofed mail is bounced before reaching anyone. What banks and large brands run.
DMARC tags worth knowing
p= policy (none / quarantine / reject)rua=mailto: where aggregate reports gopct= percent of failing mail the policy applies to (use during ramp-up)fo=1 generate a report on any authentication failuresp= subdomain policy (inherits from p= if omitted)Domains that do not send mail (the shortcut)
A parked domain, an old brand, a receive-only inbox: skip the ramp. Anything claiming to be from a non-sending domain is spoofing by definition. Two records lock it.
v=DMARC1; p=reject; rua=mailto:<you@another-domain>; fo=1
v=spf1 -all
First as a TXT at _dmarc.yourdomain.com, second on the root. Skip the SPF if you already have one. Don't stack two.
Cleanup, while you are in there
DMARC only belongs at the root: _dmarc.yourdomain.com. If you see _dmarc.www in your DNS, delete it. The root record covers every subdomain.
Custom click-tracking subdomain
Resend may show a yellow banner: "your domain uses shared click tracking." Worth fixing once you are sending real volume. Resend dashboard → Domains → Add domain. Subdomain: links. Click tracking on, open tracking off. CNAME record into DNS, verifies in 10 to 15 minutes.
A moment with this
Open the last automated email you got that landed in spam. Look at the headers if you can. Was the sending domain different from the brand on the email? Was DKIM missing? You will start to see why these three records matter the moment they fail.
Go deeper
Ready to set it up? Tell Claude: "set up Resend" or "help me with email delivery". It will handle account creation, domain verification, the API key, the webhook, and a test send.
Deploy your edge functions ⚡
Watch: Tiny servers that wake up (0:52)
Edge functions are small programs that run on the internet and handle things like: someone signs up on your website, someone buys your product, someone unsubscribes from your emails. They are the glue between your website and your database. (You may hear them called "form handlers" or "webhook handlers" elsewhere. Same thing. We call them edge functions.)
Your pack ships with nine pre-built edge functions in supabase/functions/. You fill in your secrets, push them, and deploy. Claude does this for you.
What gets deployed
events.ts to add your live events./automation-health is what does that: it turns on the two database extensions the schedule needs, then sets it running at 11:00 UTC.Before deploy: fill in your secrets
The functions read every brand-specific value (your domain, sender email, business name, Stripe payment-link IDs, and so on) from environment variables. Your pack ships a commented supabase/functions/.env.example as the template for supabase/functions/.env, which Claude pushes to Supabase as secrets in one command. Nothing brand-specific is hardcoded. If you ran the setup skills, that file is already filled in: they write each value straight from the Resend and Stripe dashboards, so the keys those services show only once never have to be retyped. Copying the template over a file that already has your values would overwrite them, so the guides always create it with a guard rather than a plain copy.
🔧 If a deploy fails
You will know it worked when each function reports "Deployed" and shows up under Edge Functions in your Supabase dashboard. A 401 or "not linked" error means you are not logged in to the Supabase CLI or the project link dropped: tell Claude "run supabase login and link my project again", then deploy once more. Any other error, paste it to Claude as-is; a failed deploy changes nothing until it succeeds, so nothing is broken while you sort it out.
A moment with this
Of the nine functions above, which two do you actually need right now? Most students start with guide-signup + confirm-email (your lead magnet flow) and add the rest as their business reaches for them. Don't deploy what you will not use yet.
Go deeper
Ready to ship them? Tell Claude: "deploy my edge functions" or "let's set up the form handlers". It will copy the env example, ask you for each value, push your secrets to Supabase, deploy each function, register the Stripe and Resend webhooks, and run a real test signup to confirm.
The 14 migrations: what each one sets up
A migration is one small file that creates or changes a table in your database. Your pack ships fourteen, and Claude applies them for you in order. You do not edit them by hand; this is just so you know what your back end holds.
See the fourteen
Watch: The quiz email that never sent (1:26)
Also in your pack: four skills that keep the whole thing healthy
Setup is not the whole job. Four more skills ship in this pack to keep what you built healthy. Run /automation-health on day one, because it is what switches your daily check on. The other three you run when you want a look.
/system-health a one-command status report on your root system: file freshness, memory, skills, and voice./automation-health switches your daily check on, then keeps reporting whether yesterday's automated emails and scheduled jobs actually worked./email-gate the hook that checks every outward email before it sends./security-audit scans for leaked keys or exposed data. You run it in depth in Module 8.Set up payments with Stripe 💳
Stripe handles your payments. When someone buys your product, Stripe processes the payment and sends a webhook to your system so it knows what was purchased. No payment page to build. No checkout flow to code. Stripe hosts it all.
What you will do
checkout.session.completed, invoice.payment_succeeded, charge.refundedTest mode now, real money after verification
You can build and test the whole flow today in Stripe's test mode, no waiting. But before you can receive real payments, Stripe has to verify your business: a bank account and an ID check. That can take a day or two to clear. If you plan to launch soon, start the verification early so it is done by the time you flip to live mode.
Three events, not one (or your income disappears)
Most "Stripe is broken" stories trace back to a webhook subscribed to one event, when it needed three. Each one captures a different kind of money:
checkout.session.completed
Fires once, when a customer finishes a checkout. New course buyers, first month of any subscription, one-off invoices. If this is missing, your welcome emails never send.
invoice.payment_succeeded
Fires every time a recurring subscription renews. Without this, your dashboard shows the first month of every membership and then goes silent. Three months in, you think your memberships generated the same income as month one. They didn't, you just stopped recording.
charge.refunded
Fires when you refund someone. The pre-built handler records this as a negative-amount row, so your year-to-date total self-corrects. No mental math.
All three are checkboxes on the same Stripe webhook setup screen. Tick all three the first time. Future-you will not have to backfill.
The income table (stripe_payments)
Your pack has two tables that record purchases. They sound similar but do different jobs:
course_purchases
One row per checkout. Tells you "who has access to what." Useful for granting course access. Does not capture renewals after month one.
stripe_payments
One row per actual payment. New checkouts, monthly renewals, refunds (as negative rows). This is the table your dashboard reads for income, year-to-date, monthly trend. Idempotent on Stripe event id and invoice id, so retries can never double-count.
Your pack ships migration 007_stripe_payments.sql and a webhook that writes to it on all three events. You do not have to build this. You only have to subscribe to the three events above. Setup guide: guides/17-stripe-setup.md in your pack.
The four words people mix up
Stripe has a few different things that all sound similar. Here is what each one actually is:
Payment link
A hosted checkout page Stripe creates for you. You give it a product and a price, Stripe gives you back a URL. You share that URL anywhere (button on your site, DM, email). Looks like buy.stripe.com/abc123.
plink (or "plink ID")
The internal ID for one of your payment links, e.g. plink_1ABC.... You see this in Stripe dashboard URLs and webhook events. It is just the unique name for that specific payment link.
Webhook
A message Stripe sends your system every time something happens (a purchase, a refund, a failed payment). Your edge function listens for these messages and reacts: send the welcome email, create the login, log the sale. The customer never sees this. It is server-to-server.
Invoice URL
A one-off bill for a specific person. You make an invoice in Stripe ("€500 for Jane Doe"), Stripe gives you a hosted URL like invoice.stripe.com/i/.... They pay it. Different from a payment link because it is personal and one-time, not a reusable product checkout.
When to use which: Payment link for products you sell repeatedly (course, membership, sessions). Invoice for one-off custom work or someone paying you a specific amount. Webhook is always running in the background, you do not pick it.
How to test the full flow without losing money
Webhooks are where most setups silently break. The payment goes through, Stripe takes the money, but the welcome email never sends and the customer is left in the dark. You need to see the whole chain run end-to-end at least once.
Which mode you are in matters here. Everything below works in test mode, today, with Stripe's test cards and no verification. Run it there first. The same steps work in live mode once Stripe has verified your business, and only the live run proves your real payment link, your real webhook and your real welcome email. If you try this in live mode before verification clears, the payment link will refuse the purchase, and that is the verification, not your setup.
The cleanest way: create a 100% discount code, apply it to your payment link, and "buy" your own product.
- In Stripe: Products → Coupons → New → 100% off. Optionally restrict to one product so you do not give it away by accident.
- Edit your payment link → Options → allow promotion codes. Save.
- Open the payment link in a private/incognito window. Use a different email than the one connected to Stripe (otherwise Stripe blocks the purchase). Apply the discount code. Complete the "purchase".
- Check three things landed: (1) the welcome email arrived, (2) the row appeared in your
course_purchasestable in Supabase, (3) you can log into the course with the magic link. - If any of those three failed, check the Stripe dashboard → Webhooks → your endpoint → recent attempts. The error message is there.
Same trick for testing membership: set up a 100% discount on the recurring price. Your "subscription" is free, you can confirm the recurring webhook fires monthly without paying yourself. Cancel the test sub when you are done.
If you would rather not deal with discount codes, the alternative is buying your own product for the real price (with a different email) and refunding yourself in Stripe afterwards. Same end-to-end test. This one is live mode only, so it needs your verification cleared, and it costs you the Stripe fee on that one transaction.
🔧 If the test purchase does not land
You will know it worked when three things are true: the attempt shows a green Succeeded under Stripe, Webhooks, your endpoint, recent attempts; a row appeared in your stripe_payments table in Supabase; and the welcome email arrived. If the money moved but nothing else happened, it is the webhook, not the payment: open that same recent-attempts list and read the response. A 401 there means your function is not receiving Stripe's signature secret, which is the most common cause and is a secrets fix, not a code fix. Paste the response body to Claude as-is. Nobody else can buy from you while you sort this out, so nothing is at risk except the test you just ran, and you can rerun it as many times as you like.
If you sell memberships, subscriptions, or anything with recurring billing, you will also need a self-serve billing page so customers can update cards, download invoices, and cancel without emailing you. Covered in Module 6.
A moment with this
Look at the last three things you sold (or want to sell). Are they repeatable products that the same checkout could handle every time? Or are they one-off custom things priced per person? That tells you whether you need payment links, invoices, or both.
Go deeper
Ready to set it up? Tell Claude: "set up Stripe" or "let's set up payment links". It will walk through account creation, the payment links, the webhook, and the discount-code end-to-end test so you can see your welcome email actually arrive.
Upgrade your dashboard to live data 📊
In Part 1, your dashboard read from local files on your laptop. Quietly useful, but only as fresh as the last time you opened a file. With Supabase live, the dashboard becomes a window into the business as it actually is, right now. Yesterday's energy. This week's saves. The contact who replied an hour ago. Always current, no manual refresh.
What changes
Before (local)
Reads from JSON files on your machine. Updates only when you edit them by hand, or when Claude does.
After (Supabase)
Reads from your live database. Refreshes itself when you save a session, complete a task, log a relationship moment.
The shift is subtle but it changes what the dashboard is for. It stops being a record you maintain and starts being a quiet companion. You glance at it on a slow morning and see your week in four languages. Soul, Mind, Heart, Body, all in one place.
Income, on top of the dashboard
When the Stripe webhook from the previous lesson is wired correctly, your dashboard's Today tab gets a strip across the top: year-to-date income, this-month income, and a 12-bar trend showing every month. It reads from the stripe_payments table, which captures one-time purchases, recurring renewals, and refunds (as negative rows). New payments appear automatically. Every renewal updates the bar for that month. Refunds subtract themselves. You never edit it by hand.
If the strip ever stays stuck at a single number for weeks while you know memberships renewed, the cause is almost always a missing Stripe event subscription, see the previous lesson. Add the missing event in Stripe and the next renewal lands on its own.
Who is moving through your course
If you sell a course, the live dashboard adds a Students tab: which lessons people open, which they finish, and where they stop. It reads the same way for any stepped flow you build, a quiz, an onboarding sequence, a sales funnel. A step everyone reaches but few finish is the one to make clearer. You wire the tracking onto your course pages in Module 6.
A moment with this
What is the one number you would actually open the dashboard to check, daily? Energy yesterday? Tasks pending? Contacts cooling? The dashboard works hardest when it answers a question you genuinely have, not when it shows everything at once.
Go deeper
Ready to flip it on? Tell Claude: "upgrade my dashboard to live data" or "move my dashboard to Supabase". It will run the migrations, connect the dashboard you built in Module 4, and confirm data is flowing before you close the session. If a migration errors mid-run, the run stops safely and nothing is lost: paste the error to Claude and continue from where it stopped.
That is the Storefront path, complete. Your database remembers, your emails send from your own domain, your payments provision themselves, and your dashboard shows it all live. Module 6 builds the pages people actually meet, the site, the forms, the course area, all connected to what you set up here.
The three Studio lessons after this one are yours too. Once the infrastructure hums, most people pull in a connector or a morning routine as well. Take them whenever you are curious.
Next: Wire Your ConnectorsWire your connectors ✨
This is your path. You are not running a storefront with a database underneath it. Your work lives in the apps you already open every day: your notes, your inbox, your calendar, your files. What changes this month is that Claude stops being a separate window you copy things into and out of. It reaches straight into those apps and does the work where the work already lives.
The thing that lets it reach in is called a connector. Picture it as a pipe between Claude and one app. Once the pipe is open, Claude can read what is in that app and act on it for you, in your words, without you switching tabs.
The four worth wiring first
You do not need all of them. Wire the ones you actually live in.
Notion 📝
Your notes, docs, and databases. Claude can read a page, add to a database, or pull the week's meeting notes.
Gmail ✉️
Your inbox. Claude can summarise the morning, find a thread, or draft a reply for you to send.
Google Calendar 📅
Your week. Claude can tell you where the heavy days are, or find the free mornings before you commit to something.
Google Drive 📁
Your files. Claude can find a document, read it, and use what is in it without you hunting for the link.
Two ways they connect, and why
There are two doors, and which door a connector uses is not up to you. It depends on the app.
Notion: from the terminal
You add Notion where you already work, by asking Claude. Say "connect my Notion" and it walks you through signing in and approving access. That is the whole setup.
Gmail, Calendar, Drive: from your Claude account
Because of the way Google sign-in works, these three are switched on in your Claude account settings, not in the terminal. You open your connectors settings in your Claude account, turn on the Google connectors you want, and sign in once. From then on they are available to Claude wherever you work, including in your system. Ask Claude and it will point you to the exact settings page for your plan.
🔧 If a connector says it is on but Claude cannot see anything
You will know it worked when you ask Claude something only that app knows, like "what is on my calendar tomorrow", and it answers with your real events rather than offering to help you set one up. If the toggle is on and Claude still comes back empty, it is almost always the account: the Google connector is tied to the account you signed in with, so if you have a personal address and a work one, turn it on again while signed in as the address that holds the calendar you meant. Start a fresh conversation afterwards, because a conversation that began before the connector existed will not pick it up mid-way. Nothing in your system changes when you connect or disconnect an app, so you can switch one off and back on as many times as you need.
Connect only what you use
A connector is real access to a real account. Turning one on lets Claude read and act inside that app. That is the point, and it is also the reason to be deliberate: wire the apps you actually want Claude working in, skip the rest, and you can always add more later. You are not locking anything in.
A moment with this
Which app do you open the most times a day, only to copy something out of it into Claude and paste the answer back? That one is your first connector. The copy-paste trip you make without thinking is exactly the trip a connector removes.
Providers change, so check the source
Notion, Google, and Claude all update their settings screens and what a connector can do. The button names and menu paths in any guide are a snapshot. If a screen does not match, ask Claude to check the current setup, and follow the provider's own live docs for the newest steps. The idea stays the same even when the buttons move.
Turn a connector into a skill ✨
A connector is the pipe. A skill is the question you send down it, saved so you never have to phrase it again. This is where connectors stop being a party trick and start saving you real time.
Think about the thing you ask for in almost the same words every week. "Pull my meeting notes from Notion and tell me what I promised people." "Read my inbox from the last day and tell me who is waiting on me." Right now you type that out each time. A skill is that whole request written down once, given a short name, so next time you type the name and Claude does the rest.
What a skill actually is
A skill is a small plain-language file that lives inside your system. It has a name and a set of instructions in ordinary English: what to read, through which connector, and what to hand back. When you type a slash and its name, Claude follows the instructions. You already met this idea in Part 1. Here you are pointing it at the connectors you just wired.
You do not write the file by hand. You describe what you want and Claude writes it for you. Both of these do the same job: a file at .claude/commands/your-name.md, or a folder at .claude/skills/your-name/, and either one gives you a /your-name command you can run any time.
Build your first one
Pick the weekly question you are most tired of asking, and hand it over. For example:
Paste to your Claude
Make me a /monday-prep skill. When I run it, read my Notion meeting notes and my Google Calendar for the past week and the week ahead, then give me one short page: what I promised people and have not closed, who is waiting on a reply, and the three heaviest days coming up. Keep it to one screen. Write the skill file, then run it once so I can see it work.
Claude writes the file, then runs it. If the first result is not shaped the way you want, you say so in plain language and it edits the file. The skill is yours. It sits in your system, you can open it, change it, or delete it, and it never phones home to anyone.
A few starters worth building
/inbox-brief reads your Gmail from the last day and hands you a one-page summary: who is waiting, what is just noise, what needs you today.
/week-ahead reads your Calendar and tells you where the free mornings are before you say yes to anything.
/note-it takes a thought and files it into the right Notion database with today's date, so ideas land in one place instead of scattering.
A moment with this
What is the sentence you retype to Claude most often? Not the hardest task, the most repeated one. That sentence, saved as a skill, is the one that buys back the most minutes. Start there, not with the impressive thing.
Go deeper
Skills get a full treatment in Module 8, including chaining several into one workflow. For now, one skill that runs cleanly is plenty. Build it, use it for a week, then build the next.
Your first automated routine ✨
A skill is something you run. A routine is something that runs on its own clock, so a piece of your week just happens without you starting it. This is the last step of your path, and it is worth being honest about how it really works before you set one up.
The honest part, first
Claude sitting in a chat with you cannot wake itself up. It does nothing between your messages, and it forgets a session once it ends. So it cannot quietly remember to do something for you tomorrow. Anything that runs on a schedule is a separate mechanism, on a real timer, that starts up a fresh Claude at the chosen time. When you set one up, you are arming that timer, not asking Claude to remember.
Keep that test in your pocket: if the honest answer to "will this happen on its own?" is "only if I open the terminal," it is not set up yet.
Two ways to run a routine on your path
You have no database to lean on, and you do not need one. Two mechanisms cover almost everything a studio wants, and Claude sets up either one for you in plain language.
1. While you are working: a timer on your machine
Ask Claude "remind me at 6pm to wrap up" or "every hour, check my inbox and tell me if anything urgent came in." It sets a timer that fires on your own computer and pops up a notification.
The catch: it only fires while Claude Code is open on your machine. Close the laptop and nothing happens. These timers also clear themselves after about a week, so they suit today and this week, not standing jobs.
2. Even when your laptop is closed: a cloud routine
Anthropic can run a scheduled Claude on its own servers. You save a routine (a prompt plus a time), and at that time a fresh Claude spins up in the cloud, does the work through the connectors you wired in the first lesson, and reports back in your Claude app. This runs whether your computer is on or off, which makes it a fit for a morning inbox summary or a Monday calendar brief.
The catch: the cloud Claude has no reach into the files on your laptop. It only knows what your connectors give it. So it is made for inbox and calendar work, not for anything that needs your local system.
Set up your first one
Start with something small and genuinely useful, like a morning inbox brief:
"Set up a routine that reads my inbox and calendar every morning at 8am and gives me a short brief: who is waiting on me, and the shape of my day. Tell me exactly where it will run and where the result lands, then set it up with me."
One honest limit of your path
A cloud routine reports back inside your Claude app, not as an email in your normal inbox. If you want a brief built from your own business data and delivered as a proper email that lands whether or not you ever open Claude, that needs the storefront pieces: a database and a server-side timer. That is the other path, and you can pull it in later if you ever want it. For now, the two routines above are yours with no infrastructure to maintain.
A moment with this
If one thing showed up on its own every morning, ready before you sat down, what would you want it to be? Pick the one that would change how the day starts. Build that first, and leave the rest until it earns its place.
Go deeper
Module 8 covers scheduled work in full, including the Routine Builder add-on that looks at everything you do on a rhythm and sets each piece up with you, one at a time, never promising a channel you have not built.
That is your path, wired ✨
Connectors into the apps you live in, skills for the questions you ask every week, and a routine or two that run without you. No database to maintain, no infrastructure to watch. Your daily work, handled, living where you already live.